|
|

|
|
Changes you make in the Schools Online training application will not affect your school data in the production version. The training database has been recently updated to reflect the data stored in the production Schools Online database for your school but it is a separate database.
Contents
Accessing Schools Online information
Changing your security questions
Transferring students out of your school
Transferring an individual student out of your school
Transferring students to your school
Maintaining student information
Viewing Enrolments for a student
Enrolling individual students in SACE classes
Adding self directed learning for an individual student
Viewing Completion for a student
Viewing ATAR status for a student
Viewing Compulsory Education Age (CEA) data for a student (SA only)
Confirming VET Qualifications for an individual
Allocating students to a Home Group
Viewing a SACE Class details (SACE Class Summary)
Updating SACE Class teacher information
Confirm completed VET Qualifications
Importing data into Schools Online
Exporting data from Schools Online
Frequently Asked Questions (FAQ)
The Schools Online training is an introduction to the Schools Online system. Participants will learn how to navigate Schools Online and how to maintain the Schools records for their school.
Schools Online is the SACE Board of South Australia data collection software for South Australia Certificate of Education (SACE) / Northern Territory Certificate of Education and Training (NTCET) students, their enrolments (both VET and SACE) and certain subject results.
The SACE / NTCET is awarded to students who successfully complete their senior secondary schooling in South Australia and the Northern Territory. SACE / NTCET completion is the main way students meet university and TAFE entry requirements. It also provides options for students who want to follow a different path into the workforce, such as:
· studying a full-time program at school after completing Year 10
· mixing part-time work and part-time study
· completing a full-time apprenticeship
· finding a full-time job with an employer, where training that meets the SACE / NTCET requirements are arranged.
To gain the SACE / NTCET, students complete a Personal Learning Plan (generally in Year 10) which helps them review their strengths and identify skills to develop. There are two SACE / NTCET stages: Stage 1, which most students do in Year 11, and Stage 2, which most students do in Year 12.
Each subject or course successfully completed earns ‘credits’ towards the SACE / NTCET. A minimum of 200 credits are required for students to gain the certificate. Ten credits equates to a semester, or half a year of study. Students will receive a grade, from A+ to E-, for each subject depending on the stage. For compulsory subjects, they will need to achieve a C grade or better.
The compulsory subjects are:
· Personal Learning Plan (10 credits at Stage 1)
· Literacy – at least 20 credits from a range of English subjects or courses (Stage 1 & Stage 2)
· Numeracy – at least 10 credits from a range of mathematics subjects or courses (Stage 1 & Stage 2)
· Research Project – an in-depth major project (10 credits at Stage 2) (SA Only)
· Other Stage 2 subjects totalling at last 60 credits.
The remaining credits (90 in SA, 100 in NT) can be gained through additional Stage 1 or Stage 2 subjects, or courses of a student’s choice. (In the Northern Territory 40 credits must be at a C grade or better.) Each school decides which subjects they will offer to their students.[1]
SACE results are used to calculate an Australian Tertiary Admission Rank (ATAR), used by the South Australian Tertiary Admissions Centre (SATAC) to determine a student’s course offerings.
See https://www.sace.sa.edu.au/students/sace-overview to find out more about the SACE and http://www.education.nt.gov.au/parents-community/curriculum-ntbos/ntcet to find out more about the NTCET.
The SACE Board of South Australia site for information about Schools Online is https://www.sace.sa.edu.au/connect/schools-online.
Use the ‘Menu’ guide to open Schools Online to the screen as you follow this document. The Hints and the Schools Online Help for that screen describe how to use the screen.
· The Menu paragraphs in this training guide display the list of selections required to find a Schools Online screen.
· Screen names and selections within a screen are displayed in bold.
· Text or graphics within the square brackets indicate actions to take within the screen.
Menu: Home > Students > Student Search > Student Search (Own School) [Enter student details] > View Student
Training 1 Instructions to open a screen (example)
(Breadcrumbs in the Schools Online screens are very similar to the Training Guide’s Menu paragraphs.)
To learn about topics in this Training Guide:
1. Use the menu instructions to find the Schools Online screen.
2. Read the Hints on the Schools Online screen. To read more detail about the screen you are viewing click on the Context Help ![]() icon and read the help topic.
icon and read the help topic.
3. To read about related topics and navigate the other Help topics click on the ‘Show’ hyperlink in the top left of the help window. This will display the topic tree, a table of contents for Schools Online Help.
Schools Online displays consistent information to help you navigate the system.
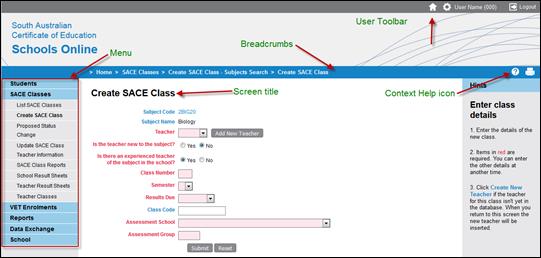
Training 2 Schools Online User Interface conventions
User details - The User Name and SACE Board school number used to log in to Schools Online are displayed at the top of the screen.
Menu - The menu at the left of the page displays the starting points for Schools Online activities. When you select a menu item from the list Schools Online will display the appropriate screen and may alter the menu options available to you.
Breadcrumbs - The breadcrumbs on each screen are displayed above the screen title. This sequence of hyperlinks indicates the sequence of opened screens. To return to a previous screen without causing data problems, click on the breadcrumb link to that screen. (Do not use your browser’s Back and Forward buttons.)
Screen Title - The title identifies the screen. The information displayed within a screen will depends on the selections you make in previous screens.
Context Help icon - Click on the Context Help icon to display the help topic relevant to current screen.
The Schools Online banner is viewable only when you are logged in to the system and is available from the top of the browser window.
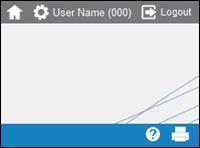
Training 3 Right hand side of Schools Online banner
Explanation of the icons used in the Schools Online banner:
· ![]() - links to view the Schools Online main home page.
- links to view the Schools Online main home page.
· ![]() - hides the menu and banner to make a printable view of the current page.
- hides the menu and banner to make a printable view of the current page.
· ![]() - logs you out of Schools Online.
- logs you out of Schools Online.
Throughout the system there are screens in which you enter search parameters.
· To go directly to the correct record enter a unique identifier, such as a Student Code, Registration Number and / or another appropriate ID.
· When you do not have an ID, enter detail to narrow the search. A list of possible matches will be returned for you to select from.
· Enter mandatory fields (red background) if your search requires them.
Entering data within Schools Online follows consistent conventions. There are three levels of helpful detail:
1. Mandatory fields are indicated by red background and labels.
2. Hints are visible on the right of the screen as you enter data.
3. Context help is available via the Context Help ![]() icon.
icon.
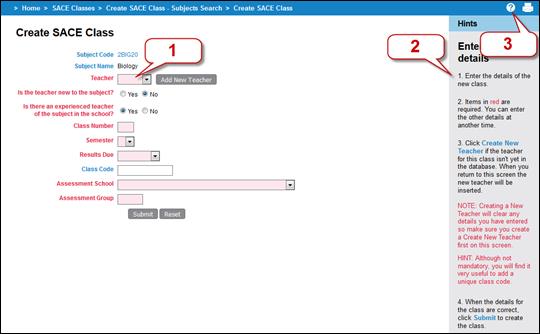
Training 4 Schools Online Data Entry conventions
Importing information about students, teachers, classes and enrolments from supported administration systems[2] at the beginning of the year reduces the double-handling of data.
The Student Code is a student identifier that is unique within a school. Use the Student Code to coordinate Schools Online records with the data in the school’s administration system.
1. Enter new students into your school’s administration system.
2. Use the Student Code it generates as the Student Code when you enter the student in Schools Online.
When Student / Candidate data is imported into Schools Online your school’s administration system, that system’s Student Code is used in Schools Online, provided that the Student / Candidate file is formatted correctly.
The data managed by Schools Online can be entered and updated manually as needed during the year.
1. Update Student / Candidate, Teacher, Class structure, SACE Enrolment, VET Enrolment and VET Qualification details, including new enrolments (supported administration system)
2. Export the files from the administration system. If the system is not one of those supported by Schools Online, modify the exported file structure to comply with the specifications published in the Schools Online Help. (See ‘Data Exchange’)
3. Import into Schools Online the compliant files in the order listed within the Import Data list.
4. Perform Group Transfers In / Out to remove students not enrolled in current SACE classes from the Schools Online and import students new to the school.
5. Allocate students to Home Groups.
6. Update class information, variants and teacher information.
Manual processing:
1. Do an end of year rollover to increment student year levels, rollover classes and teacher
2. Add any new Teachers.
3. Maintain / update the SACE and VET enrolments.
4. Maintain / update the Students.
5. Enrol students in SACE and VET enrolment.
6. Do a Group Transfer Out of the students remaining in the Schools Online without SACE or VET enrolments.
Link: https://www.sace.sa.edu.au/connect/schools-online
On the Schools Online section (link above) of the SACE Board website it gives you information about the system also you can download:
· a Schools Online cycle
· a Schools Online Training Guide
· a Schools Online Instruction sheets
NOTE: To arrange for access to Schools Online you must request access from your schools Principal’s Delegate as they have the ability to create an account, grant access and reset passwords.
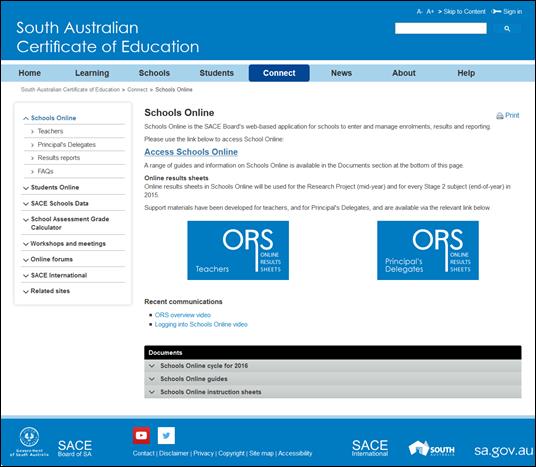
Training 5 Schools Online section of the SACE Board Website
When you login into you SACE Account you must enter your Email Address and Password.
Link: https://apps.sace.sa.edu.au/schools-online/login.dos
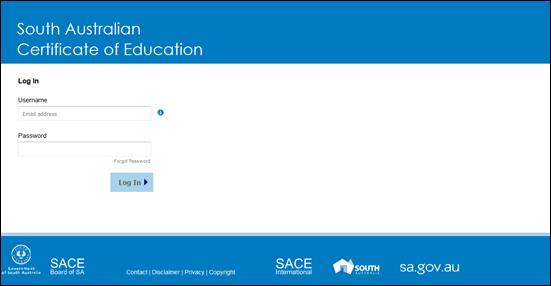
Training 6 SACE Online Account Login screen
From the Schools Online home page you can:
· check Student transfers in / out and requests
· read current news items: Information about database cut-off dates and Schools Online release information
· use the menu to access the system.
Your password is your means of protecting the privacy and security of the data stored in any SACE Board online application. Make sure that you never reveal your password to anyone.
To change your password:
1. Click on the settings icon ![]() or your name in the top right corner of Schools Online.
or your name in the top right corner of Schools Online.
2. Click on ![]() menu option.
menu option.
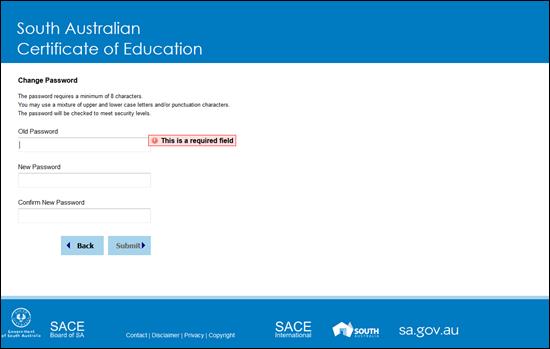
Training 7 Change Password screen
Change your password when you login into your SACE Online Account for the first time so that only you can log on SACE Online Account with your User Name.
When your account was first created and you logged in SACE Online it prompted you for five security questions used to identity you to reset your own password. It may be necessary to revisit your questions and they can be change very easily.
To change your security questions and answers:
1. Click on the settings icon ![]() or your name in the top right corner of Schools Online.
or your name in the top right corner of Schools Online.
2. Click on ![]() menu option.
menu option.
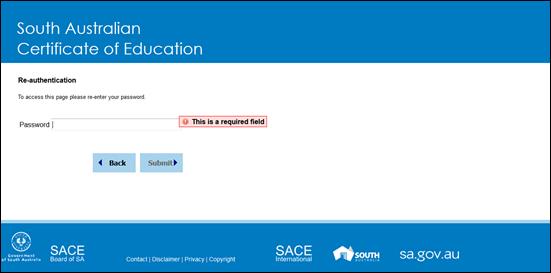
Training 8 Re-authentication required screen
As this identifies you and contains personal information we require you to re-enter your password for SACE Online.
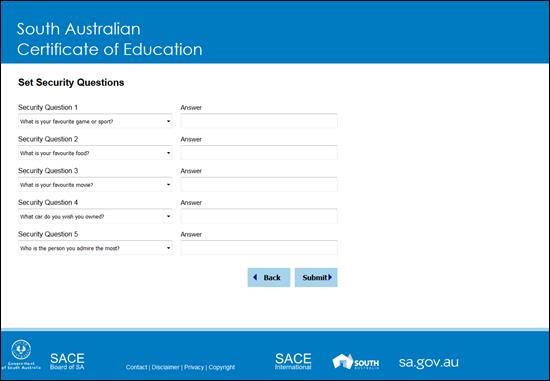
Training 9 Change Security Questions screen
1. On the Change Security Questions screen you will be able to select a new security question and enter the answer or update an existing question
2. Once all the changes have been made you can click on Submit to return to Schools Online.
To change your password:
1. Click on the settings icon ![]() or your name in the top right corner of Schools Online.
or your name in the top right corner of Schools Online.
2. Click on ![]() menu option.
menu option.
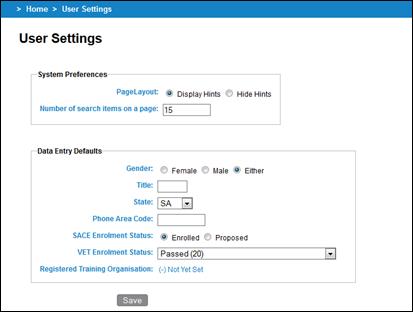
Training 10 User Settings
Each Schools Online user can set their own defaults for some settings, which are described in the Hints and the ‘User Settings’ topic within Help / Hints.
To logout of Schools Online:
1. Click on the settings icon ![]() or your name in the top right corner of Schools Online.
or your name in the top right corner of Schools Online.
2. Click on ![]() menu option.
menu option.
Menu: Home > School > Rollover > Rollover
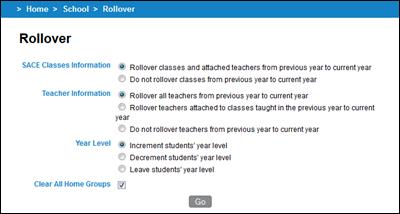
Training 11 School Rollover
Do not use the Rollover if you are importing student and class data from another administrative system.
When you update Schools Online manually the rollover facility allows you to:
· rollover your class and teacher information from the previous year to the current year
· increment, leave or decrement a year to each student's year level
· clear all home groups
Further details are described in the Hints / Help.
Menu: Home > School > Teacher List > Teacher List
From the Teacher List screen you can list current teachers, edit their name and view their current SACE classes. If a teacher has no current SACE classes they can be deleted from the Schools Online.
Menu: Home > School > Teacher List > Teacher List
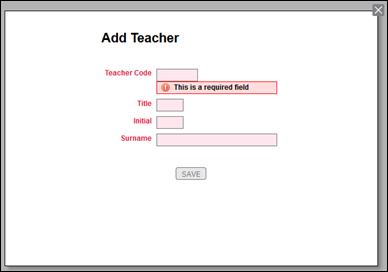
Training 12 Create Teacher
1. From the Teacher List screen, click on the Add New Teacher button.
2. Note the teacher’s unique identifier in your school administration system. Use that identifier as the Teacher Code when you enter the teacher’s details into Schools Online.
3. Enter the details of the new teachers and click Save to create a new teacher.
Menu: Home > School > Teacher List > Teacher List [Click on a Teacher Code.] > Maintain Teacher
![]()
![]()
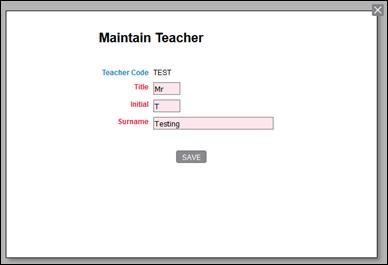
Training 13 Editing Teacher
Make the necessary changes to the Title, Initial and Family Name as required. Once changes have been made, click Save to save the changes.
HINT: To change the Teacher Code the teacher must be deleted from the database and their record recreated with the correct Teacher Code.
Students with no current year SACE enrolments or have left your school need to be transferred out from your school within Schools Online.
Menu: Home > Students > Group Transfer Out > Group Transfer Out Search [Select a Home Group or enter aYear Level, then click on the Search button] > Group Transfer Out
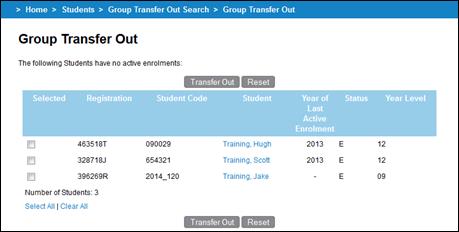
Training 14 Group Transfer Out
You may decide to process enrolments for a Home Group or Year Level and then transfer out the students with no current enrolments for that group before processing the next group.
1. Complete all student enrolments.
a) Make sure that data imports from your administration are completed.
b) Process the enrolments for new students, as described in the ‘Students’ section from page 16.
2. From the Group Transfer Out screen transfer the remaining students, who have no SACE enrolments, to the SACE Board of South Australia (School 000).
Further details about Group Transfer Out are described in the Hints / Help.
Method 1:
Menu: Home > Students > Student Search (Own School) > View Student [Click on the Transfer Out hyperlink ![]()
![]() at the bottom of the screen.]
at the bottom of the screen.]
Method 2:
Menu: Home > Students > Transfer out Requests > Transfer out Requests [Click on the Accept hyperlink for the student]
You can transfer students into your school from other Schools Online schools.
Menu: Home > Students > Students Search > [Click on the Search From Other Schools hyperlink ![]() ] > Student Search (Other Schools) [Enter details and click on the Search button] > View Student (Registered Elsewhere) [Click on the Request Transfer In hyperlink at the bottom of the screen.]
] > Student Search (Other Schools) [Enter details and click on the Search button] > View Student (Registered Elsewhere) [Click on the Request Transfer In hyperlink at the bottom of the screen.]
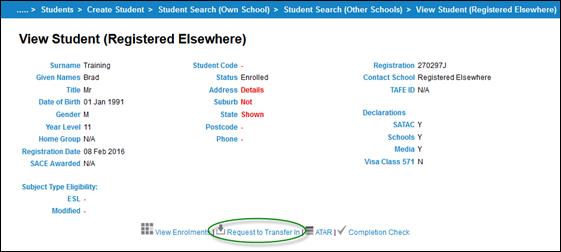
Training 15 View Student (Registered Elsewhere)
To transfer in a student into your school:
1. Search other schools for the student. If you are able to enter the student’s Registration the search will be quick.
2. Click the Request to Transfer In hyperlink.
· For Schools Online schools you will be presented with the Request to Transfer In screen. Please be mindful that the reason you enter for the transfer will become visible to the student’s current school.
· For students currently enrolled at the SACE Board of South Australia (School 000) the student will be transferred immediately.
Menu: Home > Students > Transfer out Requests > Transfer out Requests [Click on the Accept hyperlink for the student]

Training 16 Transfer out Requests
1. Click on the Accept hyperlink to transfer the student to the requesting school if you agree with the request.
2. You can view a student’s current enrolments in the Transfer Out Request Confirmation screen. If any are listed you can select the enrolments that should be deleted when the student is transferred out.
3. Click on the Transfer Out button.
HINT: If there are no enrolments, or if you have deleted those that should be removed, you will see the Transfer Out Confirmation screen with no current enrolments.
Menu: Home > Students > Create Student > Create Student [Enter the student details and click on the Save button.]
After the student has been created in the school’s administration system (Note the student’s unique ID in that system) enter their details in the Schools Online Create Student screen. Use the Student ID from the school administration system as the Student Code.
If the student details are similar to another student in the database the Check Student Duplicate screen will be displayed.
In the Check Duplicate Student screen click on the Modify button to modify the details and then click on the Save button.
Menu: Home > Students > Student Search > Student Search (Own School) [Enter details] > View Student
If you wish to edit the student’s details after the record has been saved, open the View Student screen and click on the Maintain Student hyperlink ![]() at the bottom of the screen.
at the bottom of the screen.
Menu: Home > Students > Student Search (Own School) > View Student [Click on the View Enrolments hyperlink at the bottom of the screen ![]() ]
]
From this screen you can:
· delete or withdraw current year individual enrolments (SACE & VET)
· view and edit individual enrolments (including proposed)
· add the student to a SACE class
· add Self Directed Learning
· run a Completion Check
· view the ATAR (Australian Tertiary Admission Rank) status for the student
· confirm the student’s VET qualifications.
NOTE: Duplicate VET Enrolments entered and resulted as P (Passed) will appear as in example below:

Training 17 Duplicate VET enrolment appearing with the red star.
Menu: Home > Students > Student Search (Own School) > View Student [Click on the View Enrolments hyperlink at the bottom of the screen ![]() ] > View Enrolments [Click on the Add to SACE Classes hyperlink
] > View Enrolments [Click on the Add to SACE Classes hyperlink ![]() above the list of classes] > Add Student to SACE Classes
above the list of classes] > Add Student to SACE Classes
1. Enter details and click on the View button, which displays students in the Add Students to SACE Classes screen.
2. Select the classes and click the Add to Classes button.
Menu: Home > Students > Student Search (Own School) > View Student [Click on the View Enrolments hyperlink at the bottom of the screen ![]() ] > View Enrolments [Click on the Add Self Directed Learning hyperlink
] > View Enrolments [Click on the Add Self Directed Learning hyperlink ![]() above the list of classes > Add Student to Self Directed Learning
above the list of classes > Add Student to Self Directed Learning
Select the Status and Credits and then click on the Add Students button.
Menu: Home > Students > Student Search (Own School) > View Student [Click on the View Enrolments hyperlink at the bottom of the screen ![]() ] > [Click on the Add VET Enrolment hyperlink
] > [Click on the Add VET Enrolment hyperlink ![]() above the list of enrolments > Add VET Unit of Competency
above the list of enrolments > Add VET Unit of Competency
The Add VET unit of Competency allows you to add one and / or multiple VET Enrolments for the selected student.
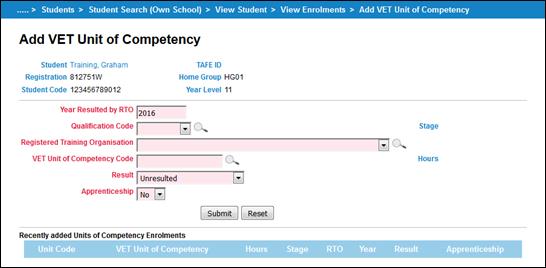
Training 18 Add VET Unit of Competency (SA)
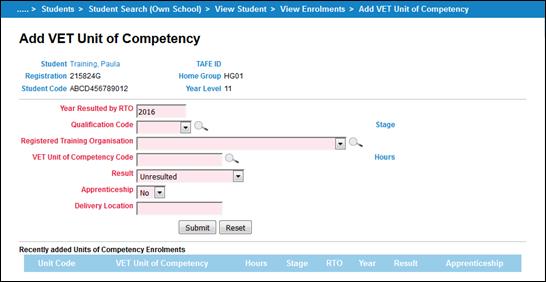
Training 19 Add VET Unit of Competency (NT)
For each enrolment you need to:
· Check the year in the Year Resulted by RTO field. It will default to the current year. Only change this if entering VET for the previous year.
· Select a Qualification Code from the list which will contain the 25 commonly used qualifications for the year entered. If the qualification you require isn’t listed you may perform a search by clicking on ![]() icon.
icon.
· Enter a VET Unit of Competency code or you may perform a search by clicking on ![]() icon.
icon.
· Select a Registered Training Organisation (RTO) from the list which will contain the 15 commonly used organisations. If the RTO isn’t listed you may perform a search by clicking on ![]() icon.
icon.
· Select the appropriate Result and Apprenticeship option.
· For Northern Territory schools, you must enter a Delivery Location.
Once the required details are selected, click on Submit to add the enrolment to Schools Online.
HINT: Once you click on Submit the added enrolment will appear listed in the Recently added Units of Competency Enrolments so you can add another VET enrolment if required.
Menu: Home > Students > Student Search (Own School) > View Student [Click on the Completion Check hyperlink at the bottom of the screen ![]() ]
]
A student's completion details demonstrate whether or not the subjects studied at Stage 1 and Stage 2 will allow the student to gain the SACE or NTCET and which subjects will contribute to fulfilling the various requirements. Detailed and summary views are available.
Menu: Home > Students > Student Search (Own School) > View Student [Click on the ATAR hyperlink at the bottom of the screen ![]() ]
]
The ATAR (Australian Tertiary Admission Rank) status indicates whether or not a student will receive an ATAR score. It does this by checking Stage 2 enrolments against a set of inbuilt rules to determine whether the grouping of subjects can be used to construct an aggregate for university entry.
Menu: Home > Students > Student Search (Own School) > View Student [Click on the Student CEA Data hyperlink at the bottom of the screen ![]() ]
]
Compulsory Education Age data can only be entered / changed via Schools Online for South Australian schools. Use this screen to maintain Compulsory Education Age (CEA) data for a student at your school.
Further details are described in the Hints / Help.
HINT: As the student is enrolled in a SACE subject a CEA Record is added automatically in the category of Secondary Education with the start defaulting to the date the enrolment was entered.
Menu: Home > Students > Student Search (Own School) > View Student [Click on the View Enrolments hyperlink at the bottom of the screen ![]() ] > [Click on the Confirm VET Qualification hyperlink
] > [Click on the Confirm VET Qualification hyperlink ![]() above the list of enrolments > Confirm Student’s Completed VET Qualification
above the list of enrolments > Confirm Student’s Completed VET Qualification
In order for the qualification (Certificate III or above) to be used for the Australian Tertiary Admission Rank (ATAR) each student needs to have successful completion of their qualification confirmed by the Registered Training Organisation (RTO) and verified by the Principal and the form submitted to the SACE Board.
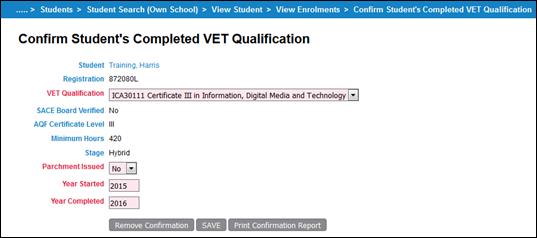
Training 20 Confirm Student’s Completed VET Qualification
For each qualification that requires confirmation you need to:
Select the VET Qualification from the drop down list.
Indicate whether a parchment already has been issued by the RTO by selecting Yes or No from the Parchment Issued drop down box.
Enter the Year Started and Year Completed for that qualification.
Once the details have been entered click on Save.
HINT: If the SACE Board has verified the qualification the SACE Board Verified field will be set to Yes. Once verified details of the confirmation cannot be changed or the confirmation removed via Schools Online.
NOTE: Each qualification has a minimum hours allocated and if the hours calculated in Schools Online is not enough it will give a warning as indicated below:

Training 21 Confirm VET Qualification Message – Not Enough Hours
HINT: If you have made a mistake and need to remove the confirmation you can click on the Remove Confirmation button.
Each qualification entered needs to have a report signed by the principal and faxed to the SACE Board. In order to produce the report you click on Print Confirmation Report button. The report will show details of the student’s qualification you just entered.
Menu: Home > Students > Home Group Allocation > Home Group Allocation Search [Select a Home Group, enter a Year Level, or select All Students, then click on the View button] > Home Group Allocation
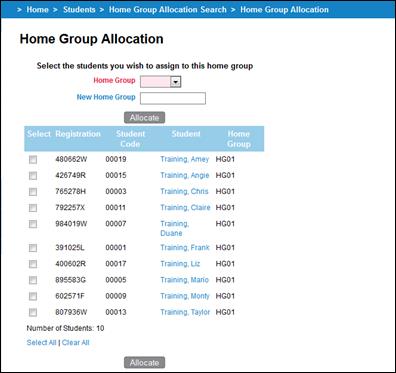
Training 22 Home Group Allocation
Select the Home Group, the students to allocate, and click on the Allocate button.
Menu: Home > Students > Group TAFE ID Entry > Group TAFE ID Entry Search [Enter aYear Level and select whether you want to Include TAFE ID already allocated, then click on View button] > Group TAFE ID Entry

Training 23 Group TAFE ID Entry
For each student listed you can enter the TAFE ID in the field provided, and then click on the Allocate button.
NOTE: When you import SACE enrolments from another administrative system they will be added to the appropriate student’s enrolment records through the SACE class structure.
Menu: Home > SACE Classes > Create SACE Class – Subjects Search [Enter a SACE Code if you know it] > Create SACE Class – Search Results [Click on the Create Class hyperlink for the class  ] > Create SACE Class
On the Create SACE Class screen:
1. Enter the required fields.
2. Enter the Class Code and Accession No. (The Accession No. is a number granted on an approved Learning and Assessment Plan).
NOTE: Entering a Class Code will make it easier to go quickly to that class in the future.
Menu: Home > SACE Classes > List SACE Classes > SACE Class Search [Enter search details] > SACE Class Selection [Click on a Class Code] > SACE Class Summary [Click on the Edit SACE Class hyperlink ![]() ] > Edit SACE Class Information
] > Edit SACE Class Information
In the Edit SACE Class Information screen you can:
· change the Teacher for the class
· edit the Class Number and Class Code
· change the Results Due depends on the time of year (i.e. Before results due June cut-off)
· for a stage 1 class: you can also edit the Variant, School Subject Name & Accession No.
· for a stage 2 class: you can also edit Assessment School, Assessment Group and the teacher information.
Method 1:
Menu: Home > School > List Teachers > Teachers List
[Click on the View SACE Classes hyperlink for a teacher ![]() ] > Teacher Details [Click on the Class Code for a SACE Class
] > Teacher Details [Click on the Class Code for a SACE Class ![]() ] > SACE Class Summary
] > SACE Class Summary
Method 2:
Menu: Home > SACE Classes > List SACE Classes > SACE Class Search [Enter class details] > SACE Class Selection [Click on the Class Code hyperlink for the subject  ] > SACE Class Summary
NOTE: Details that can be modified are according to the stage.

Training 24 SACE Class Summary (Stage 1 Compulsory Subject)
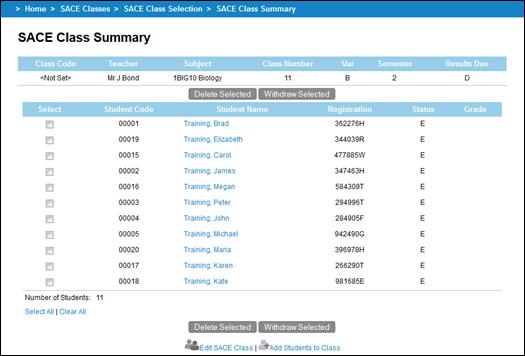
Training 25 SACE Class Summary (Stage 1 Subject)
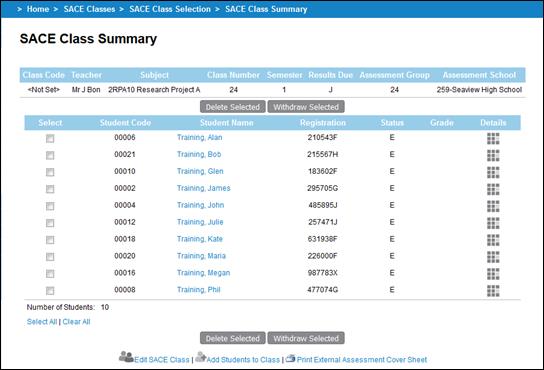
Training 26 SACE Class Summary (Stage 2 Subject)
From the SACE Class Summary screen you can:
· add, delete or withdraw students from the class
· for subjects that require eligibility you can view the status of the eligibility for that enrolment.
For stage 2 subjects that have an Investigation you can click on link at the bottom named ![]() to take you to the location on the website where you can access the External Assessment over Sheet.
to take you to the location on the website where you can access the External Assessment over Sheet.
For any SACE subjects that do not have an approved learning and assessment plan will display a warning message:

Training 27 SACE Class Summary – Stage 1 Learning and Assessment Plan warning message

Training 28 SACE Class Summary – Stage 2 Learning and Assessment Plan warning message
Menu: Home > SACE Classes > Update SACE Class Teacher Information
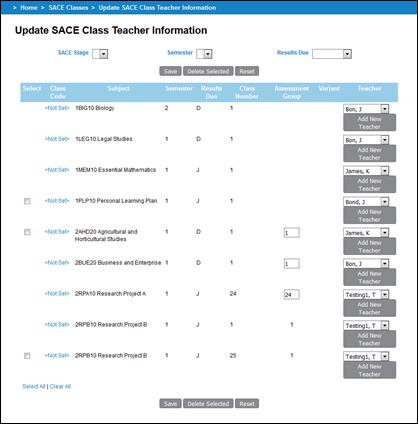
Training 29 Update SACE Class Information screen
When classes are created (either via an import or rollover) you can update information relating to that particular SACE class.
You can for each class listed on this screen:
· Delete classes with no enrolments
· Change the Teacher assigned to the class
· Change the Assessment Group assigned to stage 2 classes only.
Click on the Save button once any changes are made to save the entered information.
Menu: Home > VET Enrolments > Create VET Enrolments
This wizard will allow you to enrol a number of students in one or more units of competencies at the same time. Essentially you will identify the VET qualification, the students they wish to enrol and the units of competency in which to enrol them.
HINT: Throughout the wizard portions of the screen they can be minimised or minimised by clicking these icons ![]() for minismise and
for minismise and ![]() for maximise.
for maximise.
The screen will display a list of the 25 most commonly used VET Qualifications for the current user’s school.
You have two options to select the VET Qualification:
· Click on a commonly used qualification
· Perform a search on all VET Qualifications on the Recognition Register.
HINT: Any VET Qualification added must be on the VET Recognition Register before proceeding.
To proceed to step two of the wizard click on the qualification either from the commonly used or the search results.
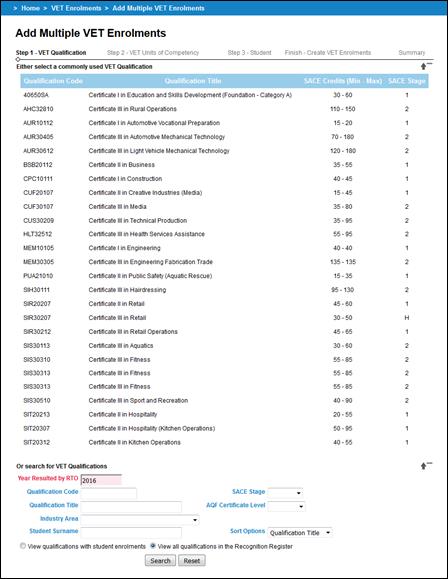
Training 30 Add Multiple VET Enrolments Wizard (Step 1 - VET Qualification)
The second step of the wizard list the commonly used 25 units of competency for the selected qualification at the current user’s school.
The qualification selected in step one will be shown throughout the wizard and if you have selected the incorrect one click on the Back to Previous Step button to take you back to step one of the wizard.
You have two options to select one or more VET Unit of Competency:
· Select one or more commonly used competencies using the box alongside the unit code.
· Perform a search on all unexpired VET Unit of competency in Schools Online.
Once either selected a commonly used competency or performed a search you click on the box alongside the VET Competencies you wish and then click on Add to Selected List below the section of the page you have selected the VET competencies.
A VET Competency selected can be removed by click on the box alongside the competency and then click on Remove From List button.
Once the selected list contains the competencies you wish to add to the qualification previous select click on Next Step button.
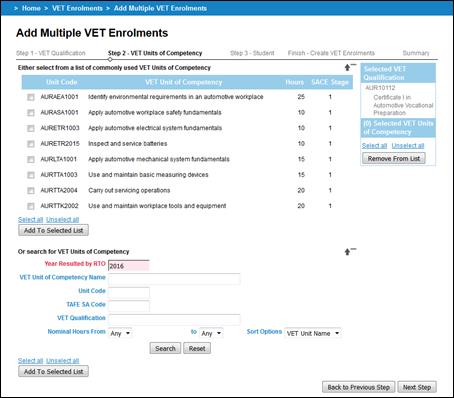
Training 31 Add Multiple VET Enrolments Wizard (Step 2 - VET Units of Competency)
The third step of the wizard allow you search for and select at least one student to add the previous selected Units of Competency under the VET Qualification selected in step one of the wizard.
You can perform a search of students by:
· an individual student by Registration, Student Code, Givens Names or Surname
· a group of students by Home Group or Year Level
· the members of a current SACE class
HINT: To add students who are not at your school, select Students from another school hyperlink and enter the student’s details.
Click on the Search button. The list of matching students is displayed in the bottom portion of the screen. Click on the box alongside the student or students you wish and then click on Add to Selected List.
A student selected can be removed by click on the box alongside the student and then click on Remove From List button.
Once the list contains the students you wish to add to the selected competencies and qualification click on Next Step button.
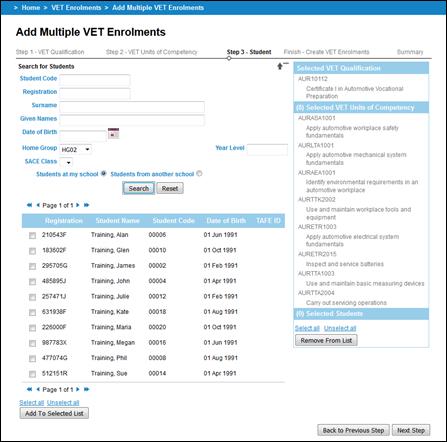
Training 32 Add Multiple VET Enrolments Wizard (Step 3 - Student)
The final step require you set the Apprenticeship, Result, Registered Training Organisation (RTO), Delivery Location (NT Schools Only) and Year fields for one or more common students.
The qualification competencies, students selected in previous steps will be shown as seen below and if you have selected the incorrect one/s click on the Back to Previous Step to take you back to step three of the wizard.
For any student selected either all or few as appropriate you enter or select common values:
· Check the year in the Year field. It will default to the current year. Only change this if entering VET for the previous year.
· Select a Registered Training Organisation (RTO) from the list which will contain the 15 commonly used organisations. If the RTO you require isn’t listed you may perform a search by clicking on ![]() icon.
icon.
· Select the appropriate Result and Apprenticeship option.
· For Northern Territory schools, you must enter a Delivery Location.
Once the common values are selected and the students are ticked you click on Create Enrolments. Once an enrolment is added to Schools Online it will appear at the bottom of the screen under the section titled Created VET Units of Competency Enrolments. Students with all their enrolments added will be removed from the list. As soon as there are no students to select or you have added the VET enrolments to the students required you can click on Finish to take you to the Summary screen
NOTE: Results can be changed as often as necessary until the database Cut-Off.
HINT: Once you begin creating enrolments you cannot go back to any previous steps of the wizard.
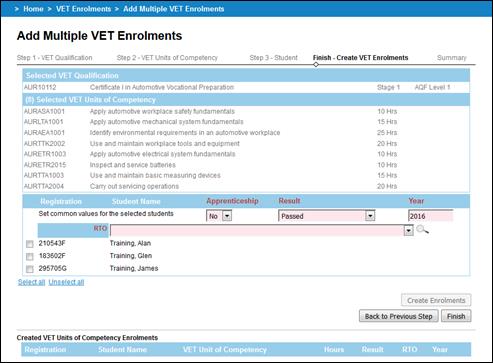
Training 33 Add Multiple VET Enrolments Wizard (Final Step - Create VET Enrolments) (SA)
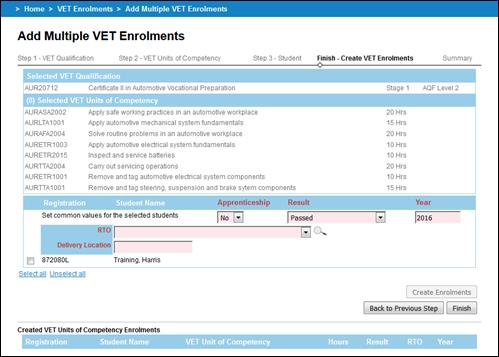
Training 34 Add Multiple VET Enrolments Wizard (Final Step - Create VET Enrolments) (NT)
This summary show you all the enrolment information added to Schools Online via the wizard.
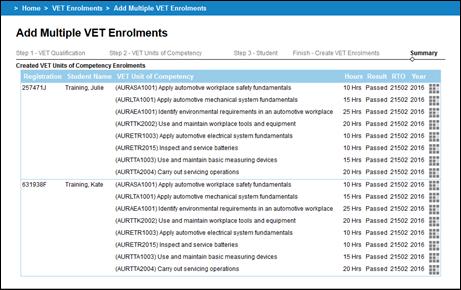
Training 35 Add Multiple VET Enrolments Wizard (Final Step - Summary)
HINT: Each individual VET enrolment can be editing by clicking on the ![]() icon along the enrolment.
icon along the enrolment.
Menu: Home > VET Enrolments > List Students by Qualifications
The List Students by Qualification provides the functionality to search and display student enrolments in units of competency, grouped by VET Qualification.
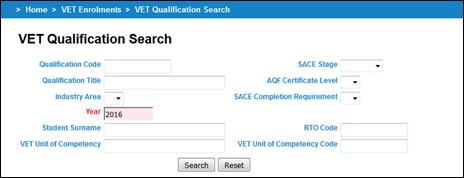
Training 36 VET Qualification Search
You can perform a search by entering/selecting one or more criteria:
· a Qualification Code, an AQF[3] Certificate Level, a SACE Stage of the qualification as on the Register, a RTO Code, and/or an SACE Completion Requirement,
· a Qualification Title or part of the title,
· select from an Industry Area,
· a Year,
· a VET Unit of Competency Code, or
· a VET Unit of Competency title or part of a title.
Click on the Search button to view matching qualifications on the List VET Qualifications and Students screen.
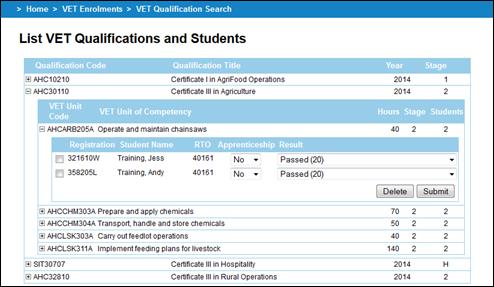
Training 37 List VET Qualifications and Students
For each qualification that matches the search performed you see the qualification records. Each qualification can be expanded by clicking on ![]() to view the Units of Competency added. Finally each Unit of Competency can be expanded to view the students enrolled in that competency.
to view the Units of Competency added. Finally each Unit of Competency can be expanded to view the students enrolled in that competency.
You can alter the Result and Apprenticeship information and then click on Submit to save the information to Schools Online.
Menu: Home > VET Enrolments > Confirm Completed VET Qualifications
In order for the qualification (Certificate III or above) to be used for the Australian Tertiary Admission Rank (ATAR) each student needs to have successful completion of their qualification confirmed by the Registered Training Organisation (RTO) and verified by the Principal and the form submitted to the SACE Board.
The report will list those qualifications currently being undertaken at the user’s school.
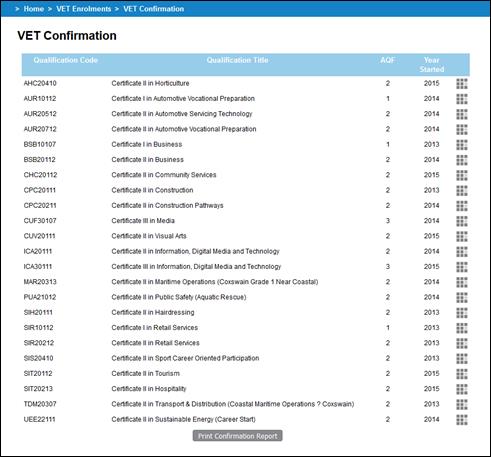
Training 38 VET Qualification Confirmation – VET Qualification Search
To enter details for each student to indicate that they have successfully completed the qualification click on the ![]() alongside the qualification.
alongside the qualification.
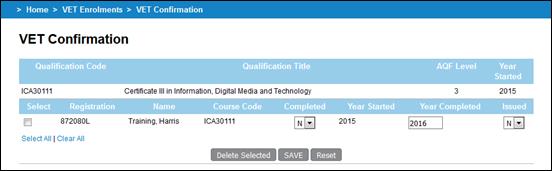
Training 39 VET Qualification Confirmation – VET Qualification Completion Details
For each student that requires confirmation you need to:
Tick the box at the beginning of each student’s name.
Indicate whether a student has successfully completed as deemed by the Registered Training Organisation (RTO) by selecting Yes (Y) or No (N) from the Completed drop down box.
Indicate whether a parchment already has been issued by the RTO by selecting Yes (Y) or No (N) from the Parchment Issued drop down box.
Enter the Year Started and Year Completed for that qualification.
Once the details have been entered click on Save.
HINT: You can confirm multiple VET Qualifications at one time by repeating the above steps.
Once all qualification details have been entered. Print the report by clicking on the Print Conformation Report button. If you have confirmed multiple VET qualification completion these will all print on the one report.

Training 40 Confirm Student’s Completed VET Qualification Verification Report that needs to be signed by the principal
NOTE: If Certificate III or above qualifications has been completed and is required for Tertiary Entrance calculations, Principal’s verification must be submitted to the SACE Board by VET results cut-off date.
· Print Confirmation Report button will populate the following report – to be printed, verified and signed by the Principal.
· Printed, verified and signed original to be couriered or faxed to SACE Board Assessment Operations (fax number is 8372 7509).
We strongly recommend that data exchanges between your administrative system and Schools Online should be done by one staff member only. That staff member needs to have administrative rights to the system.
You can import data into Schools Online from administrative systems that use the correct file formats. In South Australia EDSAS, and in the Northern Territory SAMS, support file formats compatible with Schools Online. The files and their formats are described in the Schools Online Help. The files you can import are listed below and MUST BE IMPORTED IN THE CORRECT ORDER.
Import File Order (South Australia)
1. Students (StudImp.dat*)
2. Teachers (TchrImp.dat*)
3. SACE Classes (ClassImp.dat*)
4. SACE Enrolments (EnrlImp.dat*)
5. VET Enrolments (VETRImp.dat*)
6. CEA Data (CEADataImp.dat*)
* These file names refer to EDSAS users only.
Import File Order (Northern Territory)
1. Candidates
2. Teachers
3. Class Structure
4. Enrolments
5. VET Results
6. VET Qualifications
Import warnings
You can only import one file at a time.
· Always import students and teachers before classes and enrolments.
· Do not attempt to have two imports running at the same time.
If your student import file includes a student with a name similar to a student already in the database, the system may assume you are trying to create a duplicate record and fail to import it. Remove the student from the import file and try again. If the second student is not a duplicate, you will need to enter that student manually through the Create Student screen.
· Make sure your SACE classes exist before importing SACE enrolments.
Importing the data
Menu: Home > Data Exchange > Import > Import Data
1. Select a file to import from the Type list. (Remember to import files in the correct sequence.)
2. Select the correct Date Format and browse to the File location, then click on the Import button.
3. A report will be generated, telling you if the import was successful and detailing any import errors.
If warnings are found in the import file, the correct records will be imported and the incorrect records will not. Errors found in those records will be reported to you in an error message.
For more details about importing data click on the Context Help icon ![]() and read the Help topic.
and read the Help topic.
Menu: Home > Data Exchange > Export > Export Data
You can export data from Schools Online from the Export Data screen by selecting the Export Type, Text Delimiter, Field Separator, Date Format and Include Field Headers option. You can view each data file on screen or save the file to disk. You can then import the data into another administrative software system.
Schools Online reports are available for Students, SACE Classes and VET.
Menu: Home > Reports > Student Reports > Student Reports Selection
The Report types are: Declarations Checklist, Potential Completion Details, Student Details, Student Summary, Student Tracking Summary, Students without a CEA record (SA Only) and VET Unit of Competency By Student.
Menu: Home > Reports > SACE Class Reports > SACE Class Reports Selection
The Report types are: Class Listing, Class Listing by Subject, Enrolment Checklist, Enrolments Against Learning and Assessment Plan Status Report, Learning and Assessment Plan Status Report, Program Variant Listing, Research Project – End of Semester, School Assessment Sample Materials Submission, Special Provisions Status, Stage 1 Grade Count Reports, Students Enrolled Elsewhere, Students Registered Elsewhere, Subject Enrolment Eligibility Status, Subject Listing, Teacher Class Listing and Teacher Listing.
Menu: Home > Reports > VET Reports > VET Reports Selection
The Report types are: Unit By Qualifications, VET Qualification Verification, VET Qualifications entered as completed and VET Result Sheet.
You may find the answer to one of your questions in the FAQ (Frequently Asked Questions).
Menu: Home > Help > FAQ
You should regularly visit the FAQ page within the help as this is reviewed regularly.
If further assistance is required you can contact the Schools Online Support Team using the details below:
|
|
SACE.SchoolsOnlineSupport@sa.gov.au |
|
Telephone |
+61 08 8372 7412 |
[1] SACE Board recognises learning in and beyond the classroom, including: TAFE and other Vocational Education and Training (VET) courses; university studies; courses from interstate and overseas; courses undertaken online or through other distance education technologies; and community learning, such as Country Fire Service (CFS) training or the Duke of Edinburgh’s Award, work experience and other roles such as being a caregiver or participating in a community service organisation.
[2] The supported administration systems are EDSAS in SA and SAMS in NT. The file format, for files to be imported into and exported from Schools Online, is described in the ‘Data Exchange’ topic within the Schools Online help.
[3] The Australian Qualifications Framework (AQF) is the national policy for regulated qualifications in Australian education and training. It set the certificate levels ranging from Level 1 (Certificate 1) to Level 5 (Diploma) and higher.