School menu
Map ID = 215
The School section of the system includes the rollover of students and classes, view Cut-Offs and the management of teachers who are teaching classes at your school.
Contents
Deleting a teacher from the list
Listing the classes taught by a teacher
Editing a class taught by a teacher
Managing teachers
Map ID = 165
From this screen you can:
· list the teachers added to Schools Online
· edit a teacher's personal details
· delete a teacher from the list
· view and edit the classes taught by a teacher.
Listing your teachers
Map ID = 170
Menu: Home > School > Teacher List > Teacher List
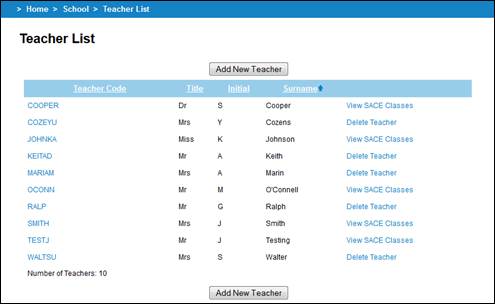
School 1 Teachers List
The list includes all teachers in the database at your school.
· The teachers who are not attached to any classes will have a Delete Teacher link on the right of their details so you can delete them easily.
· Those who are attached to classes have a View SACE Classes link. Clicking on the link opens a list of the classes they teach.
Adding a new teacher
Menu: Home > School > Teacher List > Teacher List
Map ID = 102
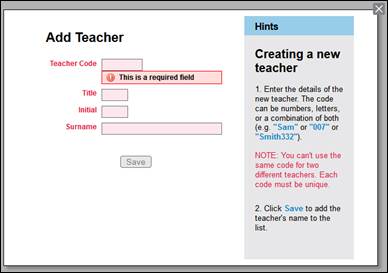
School 2 Add Teacher
You can add teachers to the database in three ways by:
· Creating them in the system, one at a time.
· Importing them as a group from another administrative system.
· Rolling them over from the previous year to the current year.
To create a new teacher:
1. From the Teacher List screen, click on the Add New Teacher button.
2. Enter a Teacher Code in any alphabetic or numeric form (e.g. Fred, Smisa, 345 or td16). This code will be attached to all classes taught by this teacher.
It is important to use the same code for each teacher in every administrative system used in the school.
3. Enter the teacher's details. You can edit the teacher's details at a later time, but you can’t change the teacher code.
4. Click Save to save the details of the new teacher in the database.
Editing teacher details
Map ID = 168
Menu: Home > School > Teacher List > Teacher List
To edit a teacher’s details:
1. From the Teacher List screen, click on the Teacher Code link. The Maintain Teacher screen opens.
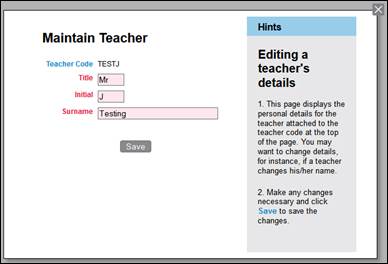
School 3 Maintain Teacher
2. Make any changes necessary and click on the Save button.
The teacher code cannot be changed but all other details can be edited.
Deleting a teacher from the list
Map ID = 166
Menu: Home > School > Teacher List > Teacher List
Teachers can only be deleted when they have no SACE classes.
To delete a teacher from the list:
1. From the Teacher List screen, click in the Delete Teacher link to the right of the Surname.
2. Click on the OK button on the delete teacher confirmation prompt.
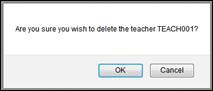
School 4 Delete Teacher confirmation prompt
3. Click on the OK button on the teacher deleted prompt.
Listing the classes taught by a teacher
Map ID = 169
Menu: Home > School > Teacher List > Teacher List
To list the SACE classes taught by a teacher:
1. From the Teacher List screen, click on the View SACE Classes link. The Teacher Details screen displays all classes taught by this teacher.
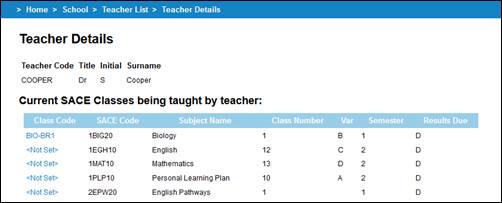
School 5 Teacher Details screen
2. Click on the Class Code link to view and/or edit the details for each class.
Editing a class taught by a teacher
Map ID = 167
Menu: Home > School > Teacher List > Teacher List
To edit a class taught by a teacher:
1. From the Teacher List screen, click on the View SACE Classes link. The Teacher Details screen displays all classes taught by this teacher.
2. On the Teacher Details screen, select the Class Code for the class you want to view and/or edit. The SACE Class Summary screen is displayed.
3. Use the SACE Class Summary screen to:
· add or delete students from the class
· change a student’s enrolment status to Withdrawn
· change a student’s ‘Proposed’ enrolments to Enrolled.
4. If there are students in the class you can perform various tasks depending on the stage and subject.
5. Click on the Save button.
You can click on the Edit SACE Class link to edit Assessment Group/School (Stage 2), class teacher and/or estimates information in the Edit SACE Class Information screen.
Performing a Rollover
Map ID = 175
The rollover facility allows you to carry over your class and variant information from one year to the next. It also provides you with a method of adding a year to each student's year level and clearing home groups (if you want to do this).
Menu: Home > School > Rollover > Rollover
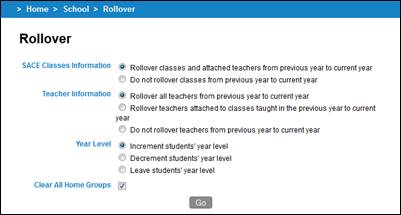
School 6 Rollover screen
You should not attempt to rollover SACE classes until the middle of January when any new SACE codes have been entered into the system.
1. Select a SACE Classes information action to perform. If you want to rollover your classes from the previous year to the current year, select Rollover classes and attached teachers from previous year to current year.
2. Select a Teacher Information action for you teachers. It is recommended that you Rollover all teachers from previous year to current year.
3. Select a Year Level action for your students. It is recommended you choose Increment students' year level.
4. Choose whether or not you want to Clear All Home Groups.
5. Click on the Go button to carry out the rollover. The Rollover Confirmation screen will be displayed.
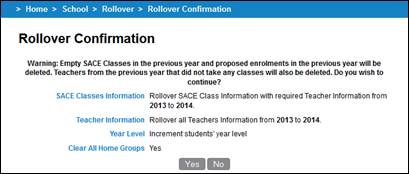
School 7 Rollover Confirmation screen
6. Check that the choices for the rollover are correct.
7. If the choices shown on this Rollover Confirmation screen are not correct, click on the No button to return to the Rollover screen where you can amend your choices.
8. If the choices shown on this Rollover Confirmation screen are correct, click on the Yes button to perform the rollover. The Rollover Success Summary screen (School 8) will report the details of a successful rollover.
The rollover will delete all the previous year's proposed enrolments, any empty SACE classes and teachers who didn’t take a class in the previous year.
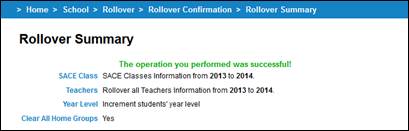
School 8 Rollover Success Summary screen
View Cut-Offs
Map ID = 186
The Cut-Off facility allows you to view the current and upcoming cut-off dates for your school. You must submit your enrolments and results by midnight on the Last Allowed Day on this page.
Menu: Home > School > Cut-offs > Cut-off Dates
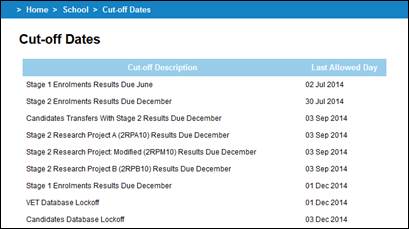
School 9 Cut-Offs Dates screen