Student menu
Map ID = 216
All the tasks you will need to perform for your students are located under the Students menu in the Schools Online. The tasks fall under several broad headings:
· adding students to the database
· searching for student registered at this school and others
· transferring students in and out
· managing student individual enrolments (VET & SACE)
· confirm a completed VET Qualification for a student
· add Self Directed Learning
· managing a student's Compulsory Education Age (CEA) data (SA Schools only)
· checking/editing a student’s details
· viewing completion and ATAR status for a student
· allocating home groups and TAFE IDs for students
· altering declarations for students (NT Schools only)
· producing student reports
Contents
Searching for a student at this school
Searching for a student registered at another school
Maintaining student personal details
Display the Maintain Student screen
Changing a student's address to overseas
Managing student Compulsory Education Age data (SA Schools only)
Display the Student CEA Data screen
Managing student enrolments - SACE classes
Viewing and editing SACE results
Deleting or Withdrawing individual enrolments
Viewing and editing Stage 1 enrolment
Viewing details of a Stage 2 enrolment
Adding a student to a SACE class
Managing student enrolments – VET
Confirming VET Qualifications for an student
Managing student enrolments - Self Directed Learning
Add Student to Self Directed Learning
Checking you have the correct student
Entering details for your school
If the student is currently registered at the SACE Board of South Australia (000)
If the student has Stage 2 enrolments (results due December)
If the student is currently at a Schools Online school
Transferring out individual students
Students requested by another Schools Online school
Accepting a transfer request from another school
Rejecting a transfer request from another school
Transferring out a group of students
Detailed view of the student's completion details
SACE Completion - Details View
Brief view of the student's completion details
SACE Completion - Hide Details View
Searching for the TAFE ID Entry group
Techniques for entering TAFE IDs
Group Declarations Entry (NT Schools Only)
Self Directed Learning has been added
Certificate Print Name (SAM Colleges only)
Students without a CEA record report (SA Schools only)
VET Unit of Competency by Student
Adding new students
Map ID = 100
You can add new students to the database by:
· importing students from another administrative system as a group;
· creating new students one at a time in Schools Online;
· transferring students into your school from another school, or from the SACE Board of South Australia.
Hints:
· Red field names indicate mandatory fields.
· Use the same student code for this student as other administrative systems at your school use.
· Enter the Date of Birth in one of the following formats (use four digits for the year):
· dd/mm/yyyy ... (e.g. 12/12/1988)
· dd MMM yyyy ... (e.g. 12 Dec 1988)
· dd MMMM yyyy ... (e.g. 12 December 1988)
When you save the student's details, the system will enter the Postcode for you.
Given Names or Surname fields must not contain non-printable characters.
Creating a new student
Menu: Home > Students > Create Student > Create Student
1. Enter the student’s details in the Create Student screen. (Students 1 Create Student (SA), or Students 2 Create Student (NT)).
2. Click on the Save button.
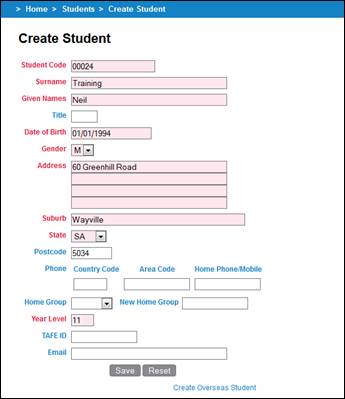
Students 1 Create Student (SA)

Students 2 Create Student (NT)
Creating an overseas student
Menu: Home > Students > Create Student > Create Student, [Click on the Create Overseas Student hyperlink ![]() ] > Create Overseas Student
] > Create Overseas Student
1. Enter the student’s details in the Create Overseas Student screen.
2. Click on the Save button.
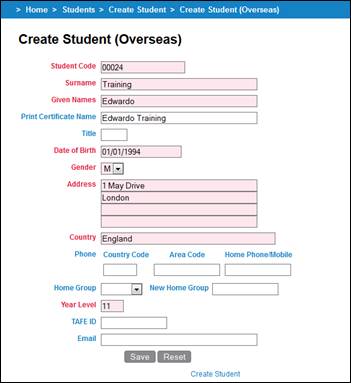
Students 3 Create Student (Overseas) (SA)
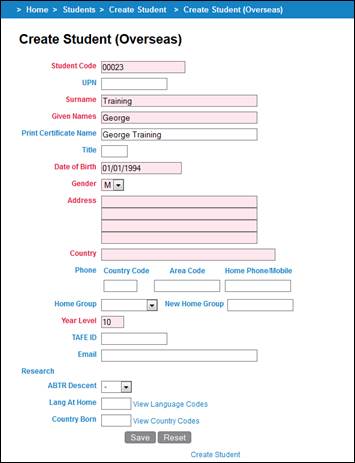
Students 4 Create Student (Overseas) (NT)
Saving the details
When you save the details for the new student a confirmation screen is displayed.
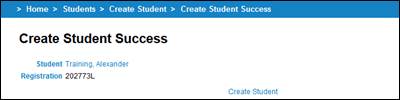
Students 5 Create Student Success
Possible duplicate student
Schools Online looks for matches on Surname, first letter of Given Name, Date of Birth and Gender. Some possible matches will be valid and others will be invalid.
Twins are an example of valid students who may be presented as possible duplicate students.
If the new student you have created appears to be a duplicate the Check Duplicate Student screen will be displayed.
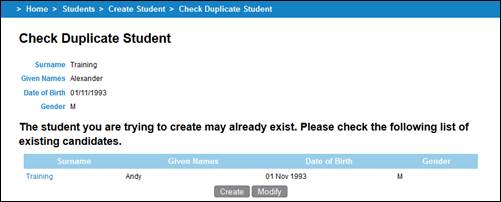
Students 6 Check Duplicate Student
To check the student(s) listed, click on their surname hyperlink:
1. If the student you are attempting to create already exists at another school, transfer them in from that school (see page 34) instead of creating a new student.
2. If one or more student details you have just entered are wrong, click on the Modify button to return to the Create Student screen so you can change those details.
3. If you believe the student you have just entered is not a duplicate, click on the Create button to add the new student to the database with a unique registration number.
Searching for a student at this school
Map ID = 171
Menu: Home > Student > Student Search > Student Search (Own School)
Use the Student Search (Own School) screen to find a student registered at your school. (When you log on to Schools Online, your SACE School Number is displayed with your user name at the top left of the Schools Online Banner.)
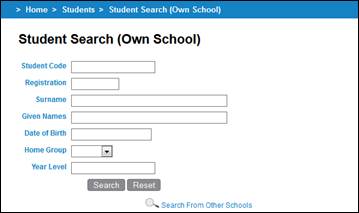
Students 7 Student Search (Own School)
To find a student, enter a student code, a SACE Board of South Australia registration number or a student's name.
· If you want to use the Date of Birth as one of your search criteria, you must use one of the following formats:
· dd/MM/yyyy ... (e.g. 12/12/1988)
· dd MMM yyyy ... (e.g. 12 Dec 1988)
· dd MMMM yyyy ... (e.g. 12 December 1988)
The year must be shown with four digits (e.g. 1989 or 2001).
To search for a group of students:
1. Enter a Home Group or Year Level.
2. Click Search to find the student(s). The Student Search Results screen will display the list of students who fit the search criteria.

Students 8 Student Search Results
3. Click the Name of the student you want. The View Student screen will be displayed (Students 9 View Student (SA), Students 10 View Student (NT)).
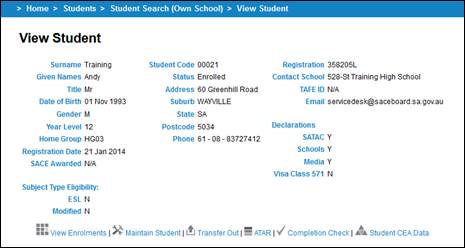
Students 9 View Student (SA)

Students 10 View Student (NT)
Searching for a student registered at another school
Map ID = 178
Use the Student Search (Other Schools) screen to find a student currently enrolled at another school. You will be able to view most, but not all, information about students who are registered elsewhere. For privacy reasons, you will not be able to see home addresses nor the home school. If you transfer a student to your school, you will see all information once the transfer process has been completed.
Entering the search criteria
Menu: Home > Student > Student Search > Student Search (Own School) [Click on theSearch from Other Schools hyperlink![]() ]
]
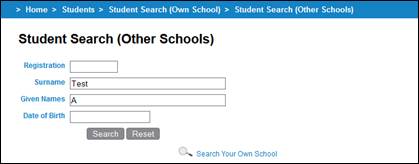
Students 11 Student search (Other Schools)
1. Enter a SACE Board of South Australia Registration number or a student's Surname. (Enter other details if they are needed to limit the search.)
2. Click on the Search button to display a list of students who fit your search criteria.
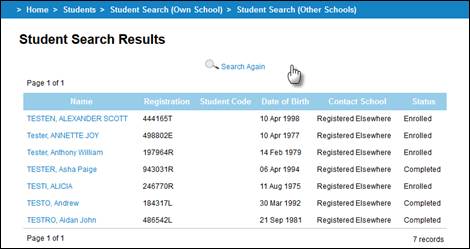
Students 12 Student Search results
Selecting a student
To display the student’s personal details:
1. In the Student Search Results screen, click on the Name hyperlink for the student.
2. View the details in the View Student (Registered Elsewhere) screen (Students 13 View Student (Registered Elsewhere) (SA), Students 14 View Student (Registered Elsewhere) (NT)).
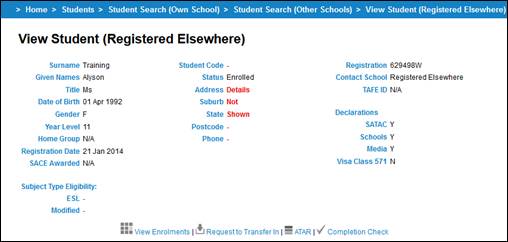
Students 13 View Student (Registered Elsewhere) (SA)
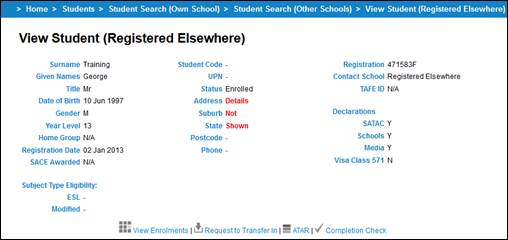
Students 14 View Student (Registered Elsewhere) (NT)
From this screen you can view:
· enrolments
· ATAR status and
· Completion.
If you need to transfer this student to your school, click on the Request to Transfer In hyperlink to send a message to the other school asking them to release the student to your school. (See more about the Request to Transfer In screen on page 34.)
Maintaining student personal details
Map ID = 182
You are able to edit student details, including setting the student address to an overseas location.
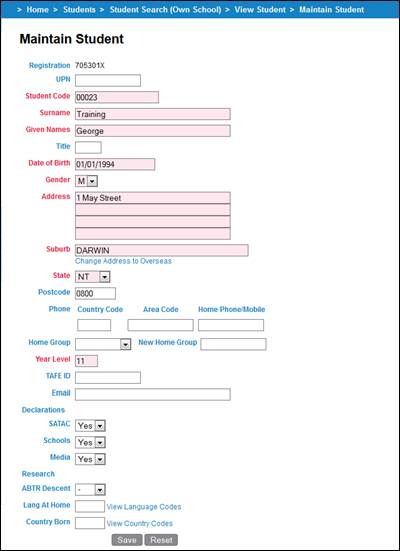
Display the Maintain Student screen
Use this screen to edit the personal details for a student registered at your school.
Menu: Home > Student > Student Search > Student Search (Own School) [Enter search details] > View Student [Click on the Maintain Student hyperlink ![]() ] > Maintain Student
] > Maintain Student
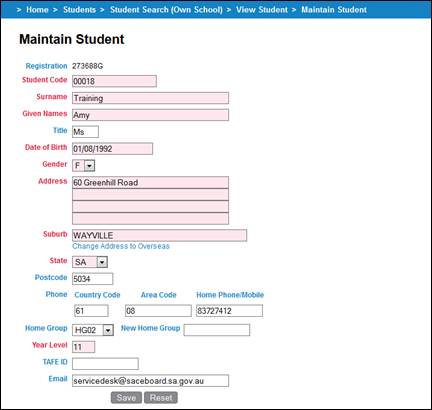
Students 15 Maintain Student (SA)
![]()
![]()
Students 16 Maintain Student (NT)
Enter changed details
To change the personal details:
1. Highlight the contents of a field and enter the new information.
Red field names indicate mandatory fields.
Given Names or Surname fields must not contain non-printable characters.
The Date of Birth must be entered in one of the following formats:
· dd/mm/yyyy (e.g. 12/12/1988)
· dd MMM yyyy (e.g. 12 Dec 1988)
· dd MMMM yyyy (e.g. 12 December 1988)
The year must be shown with four digits (e.g. 1989 or 2001).
2. Click on the Save button. The details are saved and the View Student screen is displayed.
Changing a student's address to overseas
Menu: Home > Student > Student Search > Student Search (Own School) [Enter search details] > View Student [Click on the Maintain Student hyperlink ![]() ] > Maintain Student
] > Maintain Student
From the Maintain Student screen:
1. Click on the Change Address to Overseas hyperlink ![]() (below the Suburb field). The Maintain Student (Overseas) screen is displayed (Students 17 Maintain Student (Overseas) (SA), Students 18 Maintain Student (Overseas) (NT)).
(below the Suburb field). The Maintain Student (Overseas) screen is displayed (Students 17 Maintain Student (Overseas) (SA), Students 18 Maintain Student (Overseas) (NT)).
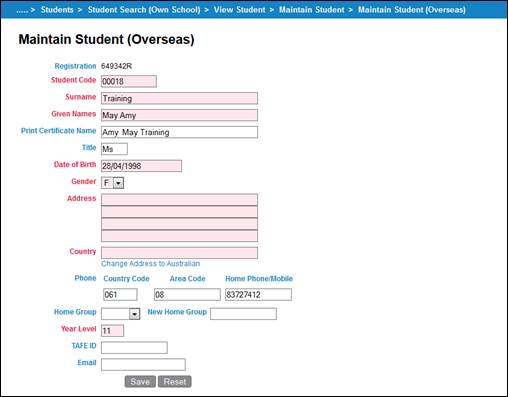
Students 17 Maintain Student (Overseas) (SA)
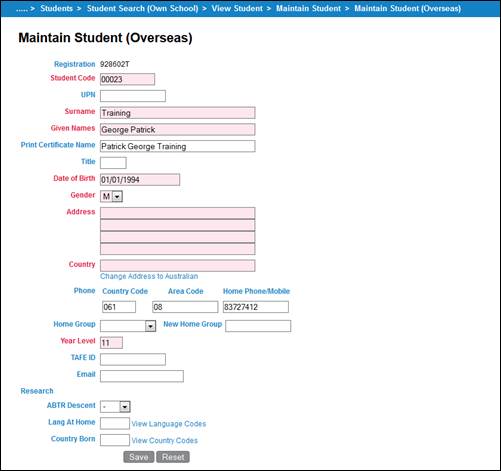
Students 18 Maintain Student (Overseas) (NT)
2. Enter the overseas address and click on the Save button.
Given Names or Surname fields must not contain non-printable characters.
3. If you need to change a student's address from overseas to Australia, click on the Change Address to Australian hyperlink ![]() .
.
Managing student Compulsory Education Age data (SA Schools only)
Map ID = 221
Compulsory Education Age (CEA) data can only be changed via Schools Online for South Australian schools. Use this screen to maintain CEA data for a student at your school.
As the student is enrolled in a SACE Subject a CEA Record is added automatically in the category of ‘Secondary Education’ with the start defaulting to the date the enrolment was entered.
Display the Student CEA Data screen
Menu: Home > Students > Student Search [Enter student details] > View Student [Click on the Student CEA Data hyperlink![]() ] > Student CEA Data
] > Student CEA Data
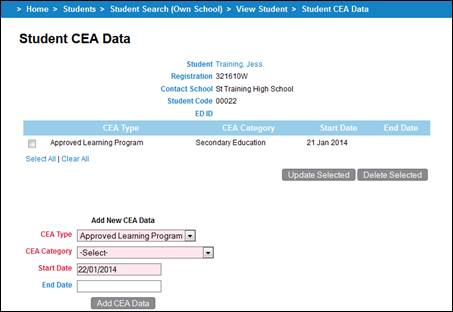
Students 19 Managing a student's CEA data
To add CEA records.
1. Select a CEA Type from the drop down list box. The CEA Type will default to ‘Approved Learning Program’ as the majority of students enrolled in your school will fall under this category.
2. Select a CEA Category from the drop down list box. If a student is enrolled at your school, their CEA type will be 'Secondary Education'.
3. The Start Date will default to today's date and does not need to be altered.
4. An End Date is optional. If an end date is entered it can’t overlap dates of existing records.
5. Click on the Add CEA Data button. The result is displayed in the same screen.
When a student leaves your school an End Date is required. The End Date needs to reflect the date the student left your school.

Students 20 Viewing the added CEA data record
If the student will leave your school for one month or less then this exemption can be managed at you school.
Exemptions for greater than one month the student needs to seek an official exemption from the Exemption Delegate in your schooling sector.
A student can only have a CEA Type of 'Exemption' if they have had an exemption application approved by the Exemption Delegate.
· A student who has a combination of learning (i.e. some learning at TAFE) must still have a CEA Category of 'Secondary Education'.
To delete a CEA record from this screen:
1. Select the CEA record.
2. Click on the Delete Selected button.
Managing student enrolments
The enrolments for an individual student are handled from within the Students section of the system. Group enrolments are handled from within the SACE Classes or VET enrolments sections.
· From the View Enrolments screen both SACE and VET enrolments can be added, modified or deleted for an individual student.
· To view, edit, delete or withdraw the SACE and VET enrolments for an individual, select View Enrolments from the View Student screen to display the View Enrolments screen.
· Self Directed Learning can be added for an individual student.
Managing student enrolments - SACE classes
Map ID = 194
Viewing and editing SACE results
Menu: Home > Students > Student Search > Student Search (Own School) [Enter student details] > View Student [Click on the View Enrolments hyperlink![]() ] > View Enrolments
] > View Enrolments
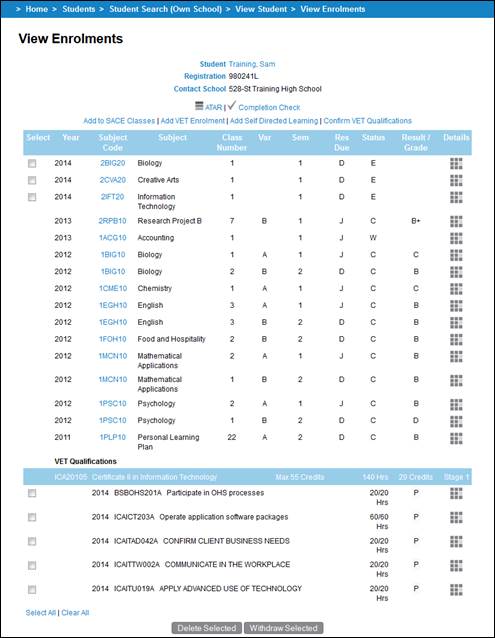
Students 21 View Enrolments
NOTE: Duplicate VET Enrolments entered and resulted as P (Passed) will appear as an example below:

Students 22 View Enrolments – Duplicate VET Competencies added
From this screen you can:
· delete or withdraw current year individual enrolments (SACE & VET)
· view and edit individual enrolments (including proposed)
· add the student to a SACE class
· add the student to VET Enrolments
· add Self Directed Learning
· run a Completion Check
· view the ATAR status for the student
Deleting or Withdrawing individual enrolments
You can only delete or withdraw a current enrolment. Completed enrolments are not editable or removable.
Menu: Home > Students > Student Search > Student Search (Own School) [Enter student details] > View Student [Click on the View Enrolments hyperlink![]() ] > View Enrolments
] > View Enrolments
On the View Enrolments screen, if you are the teaching school, you can see a checkbox in front of each current enrolment.
To delete an enrolment:
1. Set the checkbox for the enrolment you wish to delete or withdraw.
2. Click on the Delete Selected or Withdraw Selected button at the bottom of the screen.
3. Notice the changes in the View Enrolments screen. Deleted enrolments will be removed and withdrawn enrolments will be displayed with W in the Status column.
Viewing and editing Stage 1 enrolment
You can only edit a current year enrolments. Completed enrolments are not editable.
The only change you can make to a stage 1 enrolment from the Edit SACE Enrolment screen is to change the Grade.
Menu: Home > Students > Student Search > Student Search (Own School) [Enter student details] > View Student [Click on the View Enrolments hyperlink![]() ] > View Enrolments
] > View Enrolments
To edit a stage 1 enrolment:
1. From the View Enrolments screen, click on the Details hyperlink for a stage 1 enrolment ![]() . The Edit Stage 1 Enrolment screen is displayed.
. The Edit Stage 1 Enrolment screen is displayed.
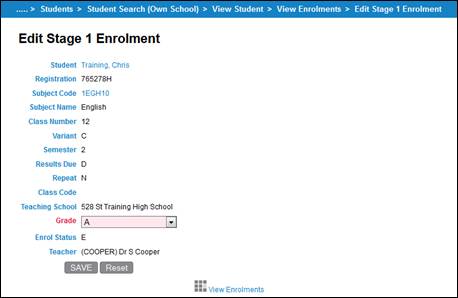
Students 23 Edit Stage 1 Enrolment screen
2. Select the appropriate grade from the list and then click on the Save button.
Viewing details of a Stage 2 enrolment
From the Edit Stage 2 Enrolment screen you can only view details of the enrolment selected.
Menu: Home > Students > Student Search > Student Search (Own School) [Enter student details] > View Student [Click on the View Enrolments hyperlink![]() ] > View Enrolments
] > View Enrolments
To view details of a stage 2 enrolment:
1. From the View Enrolments screen, click on the Details hyperlink ![]() for a stage 2 enrolment
for a stage 2 enrolment ![]() . The Edit Stage 2 Enrolment screen is displayed.
. The Edit Stage 2 Enrolment screen is displayed.
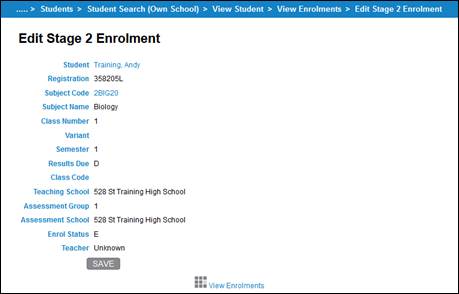
Students 24 Edit Stage 2 Enrolment screen
Adding a student to a SACE class
Menu: Home > Students > Student Search > Student Search (Own School) [Enter student details] > View Student [Click on the View Enrolments hyperlink![]() ] > View Enrolments
] > View Enrolments
To add a student to a SACE Class:
1. From the View Enrolments screen, click on the Add to SACE Classes hyperlink![]() . The Add Student to SACE Classes screen is displayed.
. The Add Student to SACE Classes screen is displayed.
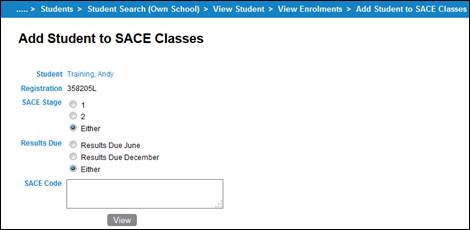
Students 25 Add Student to SACE Classes - Subject Search
2. Select Stage and Results Due options. To narrow the search further, include one or more SACE Code, separated by a comma.
3. Click View to display the Add Student to SACE Class screen.
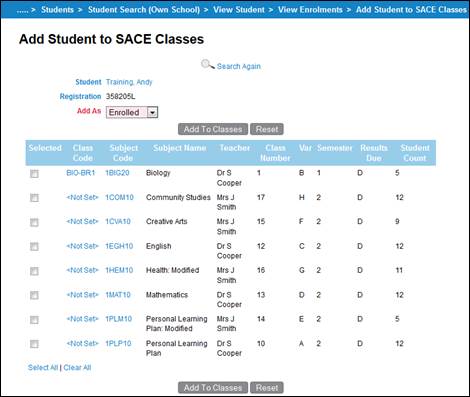
Students 26 Add Student to SACE Classes - Subject List
4. Select an enrolment status from the Add As list.
It is recommended that you choose Enrolled as the enrolment status for all SACE enrolments unless creating a proposed enrolment for tracking purposes.
5. Select a subject from the list ![]() .
.
6. Click on the Add To Classes button.
Managing student enrolments – VET
Adding a VET enrolment
Menu: Home > Students > Student Search (Own School) > View Student [Click on the View Enrolments hyperlink at the bottom of the screen ![]() ] > [Click on the Add VET Enrolment hyperlink
] > [Click on the Add VET Enrolment hyperlink ![]() above the list of enrolments > Add VET Unit of Competency
above the list of enrolments > Add VET Unit of Competency
The Add VET unit of Competency allows you to add one and/or multiple VET Enrolments for the selected student.
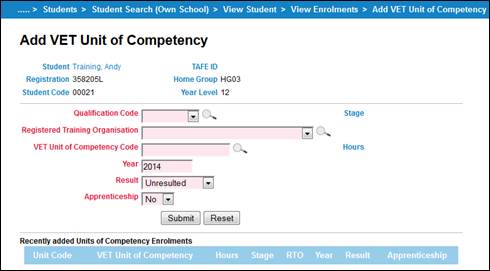
Students 27 Add VET Unit of Competency (SA)
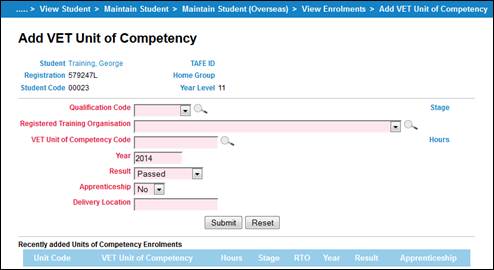
Students 28 Add VET Unit of Competency (NT)
For each enrolment you need to:
· Select a Qualification Code from the list which will contain the 25 commonly used qualifications. If the qualification you require isn’t listed you may perform a search by clicking on ![]() icon.
icon.
· Enter a VET Unit of Competency code or you may perform a search by clicking on ![]() icon.
icon.
· Check the year in the Year field. It will default to the current year. Only change this if entering VET for the previous year.
· Select a Registered Training Organisation (RTO) from the list which will contain the 15 commonly used organisations. If the RTO isn’t listed you may perform a search by clicking on ![]() icon.
icon.
· Select the appropriate Result and Apprenticeship option.
· For Northern Territory schools, you must enter a Delivery Location.
Once the required details are selected click on Submit to add the enrolment to Schools Online.
HINT: Once you click on Submit the added enrolment will appear listed in the Recently added Units of Competency Enrolments so you can add another VET enrolment if required.
Confirming VET Qualifications for an student
Menu: Home > Students > Student Search (Own School) > View Student [Click on the View Enrolments hyperlink at the bottom of the screen ![]() ] > [Click on the Confirm VET Qualification hyperlink
] > [Click on the Confirm VET Qualification hyperlink ![]() above the list of enrolments > Confirm Student’s Completed VET Qualification
above the list of enrolments > Confirm Student’s Completed VET Qualification
In order for the qualification (Certificate III or above) to be used for the Australian Tertiary Admission Rank (ATAR) each student needs to have successful completion of their qualification confirmed by the Registered Training Organisation (RTO) and verified by the Principal and the form submitted to the SACE Board.
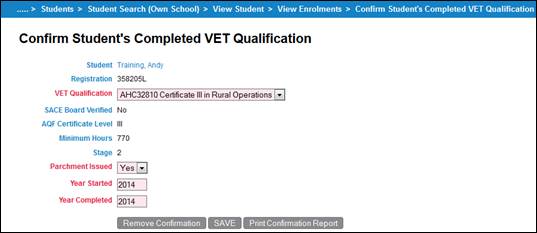
Students 29 Confirm Student’s Completed VET Qualification
For each qualification that requires confirmation you need to:
-
Select the VET Qualification from the drop down list.
-
Indicate whether a parchment already has been issued by the RTO by selecting Yes or No from the Parchment Issued drop down box.
-
Enter the Year Started and Year Completed for that qualification.
-
Once the details have been entered click on Save.
NOTE: Each qualification has a minimum hours allocated and if the hours calculated in Schools Online is not enough it will give a warning as indicated below:

Students 30 Confirm VET Qualification Message – Not Enough Hours
HINT: If you have made a mistake and need to remove the confirmation you can click on the Remove Confirmation button.
Each qualification entered needs to have a report signed by the principal and faxed to the SACE Board. In order to produce the report you click on Print Confirmation Report button. The report will show details of the student’s qualification you just entered.
Managing student enrolments - Self Directed Learning
Map ID = 201
Add Student to Self Directed Learning
Assessors will evaluate the community learning on the evidence presented by the student. Those assessors will either be from the SACE Board of South Australia or be school-based assessors trained by the SACE Board of South Australia. The assessors will make their decisions about the value of the learning that has taken place in terms of the:
· number of SACE credits that will be awarded;
· SACE level (Stage 1 or Stage 2) that was achieved;
· SACE standard achieved;
Stage 2 Self Directed Learning must be submitted on appropriate form so it can be added to Schools Online by the SACE Board of South Australia.
For stage 1 Self Directed Learning once it has been assessed and approved it can be added in Schools Online.
Home > Students > Student Search > Student Search (Own School) [Enter student details] > View Student [Click on the View Enrolments hyperlink![]() ] >Add Self Directed Learning > Add Students to Self Directed Learning
] >Add Self Directed Learning > Add Students to Self Directed Learning
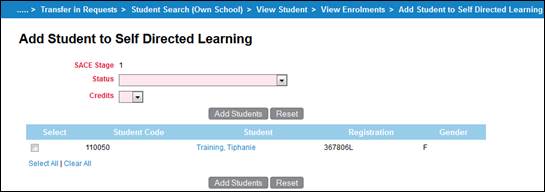
Students 31 Add Student to Self Directed Learning
To add students to Self Directed Learning:
1. On the Add Students to Self Directed Learning screen select the Status and Credits based on the SACE Board of South Australia assessor results from the students' interview and evidence.
2. Click in the Select check box for the student you wish to add to Self Directed Learning from this list.
3. Click on the Add Students button. The Self Directed Learning Confirmation screen is displayed.
Once Self Directed Learning has been added to Schools it cannot be removed via Schools Online.
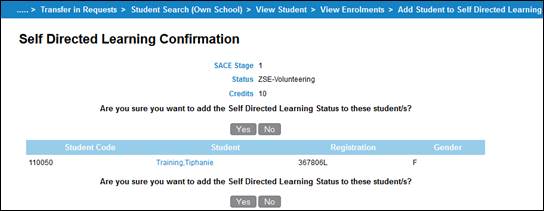
Students 32 Self Directed Learning Confirmation screen
4. Click on the Yes button.
Transferring in a student
Map ID = 204
To transfer a student in to your school you must request a transfer from another school. That school has the right to accept the request for transfer or reject it.
Checking you have the correct student
Menu: Home > Students > Student Search > Student Search (Own School) [Click on theSearch from Other Schools hyperlink![]() ] > Student Search (Other Schools) [Enter Student details] > View Student (Registered Elsewhere)
] > Student Search (Other Schools) [Enter Student details] > View Student (Registered Elsewhere)
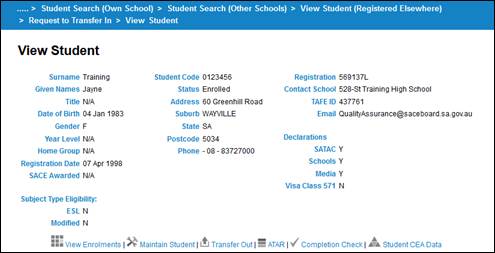
1. On the View Student (Registered Elsewhere) screen, check the student details to be sure this is the student you want to transfer in to your school.
Some details are not shown because the student is registered at another school.
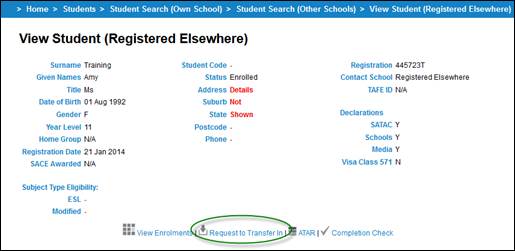
Students 33 View Student (Registered Elsewhere)
2. Click on the Request to Transfer In hyperlink at the bottom of the screen. The Request to Transfer In screen is displayed.
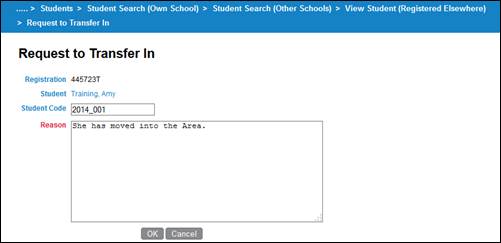
Students 34 Request to Transfer In screen
Entering details for your school
1. Enter your school’s student code for this student.
Make sure you use the same code as the one used for that student in other administrative systems in your school. If you do not enter a student code it will default to the student's registration number.
2. Enter a Reason for the request and click on the OK button.
If the student is currently registered at the SACE Board of South Australia (000)
· Students currently registered at the SACE Board of South Australia (000) will be transferred to your school immediately.
· The View Student screen will now display all details for the student.
Students 35 View Student screen for a student transferred to your school
If the student has Stage 2 enrolments (results due December)
· Once the cut-off date has passed (see Cut-Offs in Schools Online) all transfers for students with Stage 2 enrolments may not be transferred until the new year.
If the student is currently at a Schools Online school
· If the student is currently registered at a school that uses Schools Online a request for transfer in will be passed to the other school.
· The View Student (Registered Elsewhere) screen will display a message informing you that the request has been lodged.
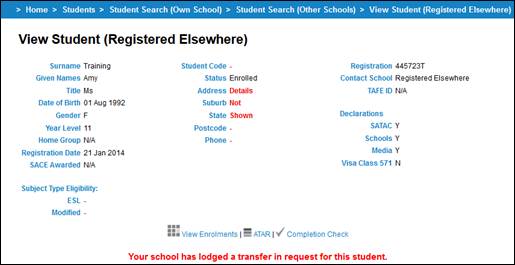
Students 36 View Student screen with transfer in request message
To view the status of your requests for transfer in with other Schools Online schools:
1. From the menu, select Home > Students > Transfer in Requests. The Transfer in Requests screen will open, displaying a summary of your school’s Transfer In requests.
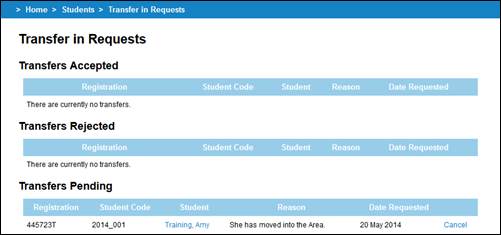
Students 37 Transfer In Request status screen
2. View the transfer in requests, which are grouped as Transfers Accepted, Transfers Rejected and Transfers Pending.
3. To remove items from the Transfers Accepted and Transfers Rejected lists, click on the Acknowledge hyperlink.
4. To remove an item from the Transfers Pending list, click on the Cancel hyperlink.
Transferring out students
Map ID = 206
You can transfer out students individually or as a group.
· An individual student can be transferred out from the View Student screen by clicking the Transfer Out link at the bottom of the screen.
· Students can also be transferred out individually in response to a request for the student from another Schools Online school. These requests are displayed on the Transfer Out Requests screen which is found on the Students menu.
· A group of students can be transferred out from the Group Transfer Out screen by clicking Group Transfer Out on the Students menu.
Transferring out individual students
When a student is no longer at your school, you should transfer that student out. This moves the student from your school to the SACE Board of South Australia (School 000).
Menu: Home > Students > Student Search > Student Search (Own School) [Enter Student Details] > View Student
To transfer out an individual student:
1. Check the student details on the View Student screen to be sure this is the student you want to transfer out from your school
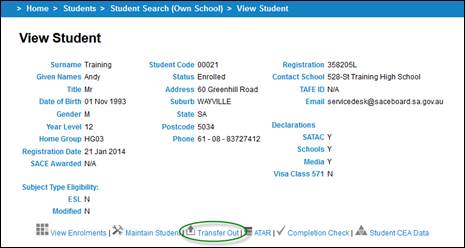
Students 38 View Student screen
2. Click on the Transfer Out hyperlink to display the Transfer Out Request Confirmation screen.
When you transfer out a student, the current enrolments you select, plus all proposed enrolments, will be deleted.
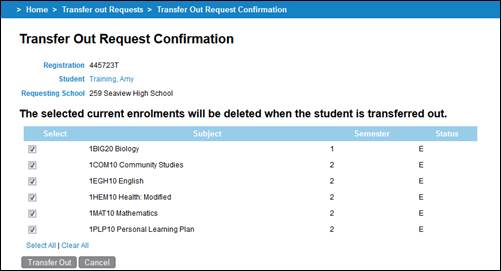
Students 39 Transfer Out Request Confirmation screen
3. Select the enrolments you want deleted.
4. Click on the Transfer Out button to complete the transfer out procedure. The student will be transferred to SACE Board of South Australia (School 000).
Students requested by another Schools Online school
When another Schools Online school enters a request to transfer in a student who is currently registered at your school, that request will be directed to your school. You can view these requests on the Transfer Out Requests screen.
Menu: Home > Students > Transfer out Requests > Transfer out Requests
On the Transfer out Requests screen you will see each of the requests for transfer with both an Accept and Reject hyperlink.

Students 40 Transfer out Requests screen
Accepting a transfer request from another school
1. Click on the Accept hyperlink to transfer the student to the requesting school if you agree with the request.
2. View the student’s current enrolments in the Transfer Out Request Confirmation screen.
3. Select the enrolments that should be deleted when the student is transferred out.
If there are no enrolments, or if you have deleted those that should be removed, you will see the Transfer Out Request Confirmation screen with no current enrolments. Also if the enrolment has been cut-off you will see the details in the bottom section of the Transfer Out Request Confirmation screen
4. Click on the Transfer Out button
Rejecting a transfer request from another school
If you have a reason for rejecting a request for transfer:
1. From the Transfer Out Requests screen, click on the Reject hyperlink for the request. The Reject Transfer Out Request screen is displayed.
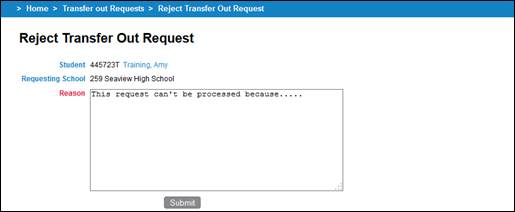
Students 41 Reject Transfer Out Request screen
2. Enter a Reason for rejecting the request and click on the Submit button to forward this message to the requesting school. Your message will appear on the Transfer In Requests screen at the other school.
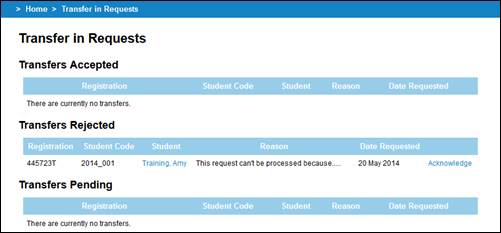
Students 42 Transfer in Requests screen with Transfers Rejected reason
Transferring out a group of students
Map ID = 227 (TBC)
The students you want to transfer out of your school are those who have:
· left the school
· no active enrolments for the current year
The Group Transfer Out may include students who have:
· left the school (i.e. completed students or those who have left for another reason)
· no active enrolments for the current year
· not yet been assigned to classes (i.e. students who are new to the school or new to the SACE).
Menu: Home > Students > Group Transfer Out > Group Transfer Out Search
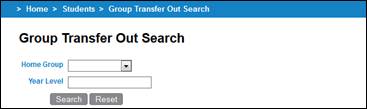
Students 43 Group Transfer Out Search Screen
To transfer a group of students out of your school:
1. Select the group of students you want to select from:
· Home Group - choose a home group from the list.
· Year Level - enter a year level.
2. Click on the Search button to display the Group Transfer Out screen.
3. From the Group Transfer Out screen, select the students from the list.
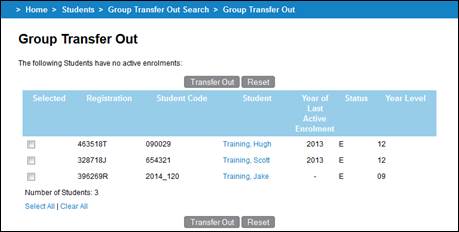
Students 44 Group Transfer Out screen
4. Click on the Transfer Out button. These students are transferred to the SACE Board of South Australia (School 000).
Viewing completion details
Map ID = 114
A student's completion details demonstrate whether or not the subjects studied at Stage 1 and Stage 2 will allow the student to gain the SACE and which subjects will contribute to fulfilling the various requirements. Detailed and summary views are available.
From the Student Completion screens:
· To return to the View Student screen, click on the student's name hyperlink.
· To display the ATAR status screen, click on the ATAR hyperlink![]() .
.
Detailed view of the student's completion details
The completion check shows the detailed view unless you click on the Hide Details hyperlink.
Menu: Home > Students > Student Search > Student Search (Own School) [Enter student details] > View Student [Click on the View Enrolments hyperlink![]() ] > View Enrolments
] > View Enrolments
To view the Student Completion Details from the student’s View Enrolments screen:
1. Click on the Completion Check hyperlink![]() . The Student Completion Details screen opens.
. The Student Completion Details screen opens.
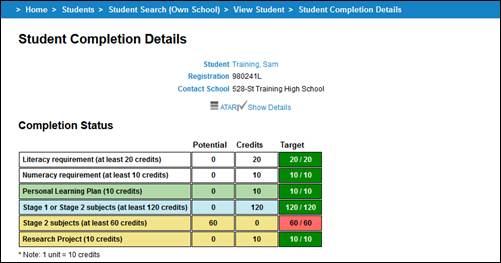
SACE Completion - Details View

Students 45 Student SACE Completion Details - Details View
This screen shows all SACE Completion requirements and indicates which subjects have been credited against each requirement.
· To the View Student screen, click on the student's name hyperlink.
· To display the ATAR status screen, click on the ATAR hyperlink.
Brief view of the student's completion details
The completion details are the default view.
To view the student completion as a summary, click on the Hide Details hyperlink ![]() on the Student Completion Details screen.
on the Student Completion Details screen.
SACE Completion - Hide Details View
Students 46 Student SACE Completion Details – Hide Details View
Viewing ATAR Status
Map ID = 135
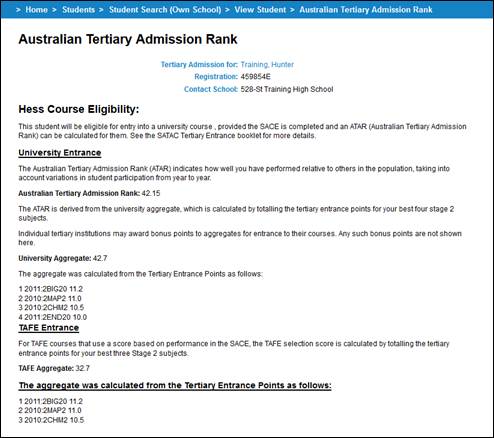
The ATAR (Australian Tertiary Admission Rank) Status indicates whether or not a student will receive an ATAR score. It does this by checking scored Stage 2 enrolments against a set of inbuilt rules to determine whether the grouping of subjects can be used to construct an aggregate for university entry.
The ATAR score checker will not calculate an ATAR score. It will merely indicate whether or not the student is enrolled in a group of subjects that will allow an ATAR to be calculated.
Menu: Home > Students > Student Search > Student Search (Own School) [Enter student details] > View Student [Click on the ATAR hyperlink ![]() ] > ATAR
] > ATAR
1. To display the ATAR status, from the View Student screen select ATAR.
Students 47 ATAR status screen for a student
2. Use the information to check that a student will gain an ATAR score.
If the student's subject list includes precluded studies or has not enough subjects, they will be displayed.
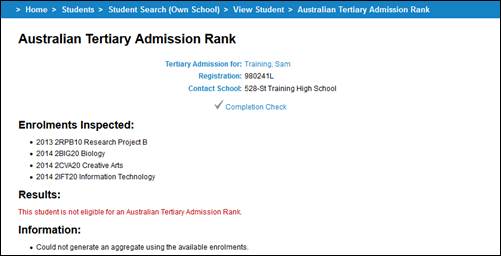
Students 48 Students with not enough subjects will be displayed
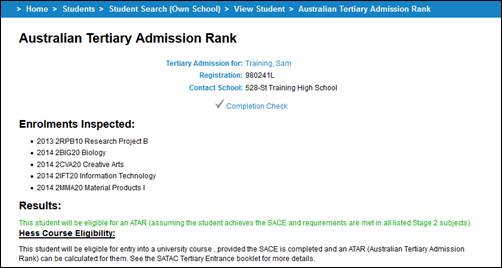
ATAR for completed students
· If the student selected has completed the SACE and has gained an ATAR for tertiary entry, the Australian Tertiary Admission Rank screen will look different, as shown below.
Students 49 ATAR status screen for a completed student
If the completed student has not gained an ATAR, the information will be displayed but no values will show.
Managing Home Groups
Map ID = 151
To allocate a selection of students to a home group you can select some students from:
· an existing Home Group to allocate to a New Home Group;
· a particular Year Level; or
· the list of All Students at your school.
Searching for the home group
Menu: Home > Students > Home Group Allocation > Home Group Allocation Search
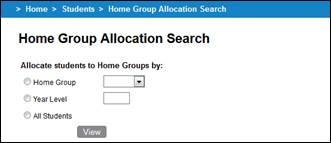
Students 50 Home Group Allocation Search screen
To allocate students to a home group:
3. Select the group of students you want to select from:
· Home Group - click the radio button and choose a home group from the list.
· Year Level - click the radio button and enter a year level.
· All Students - click the radio button.
4. Click on the View button to display the Home Group Allocation screen.
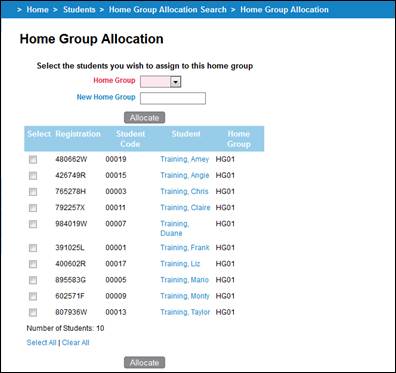
Students 51 Home Group Allocation screen
Allocating home groups
1. Decide where to allocate the students:
· If to a current home group, select a Home Group from the list.
· If to a new home group, enter the name of the new home group in the New Home Group field.
2. Select the students you want to allocate to this home group by clicking the checkbox by each student's name.
3. Click on the Allocate button.
Entering TAFE IDs
Map ID = 152
Students who study TAFE modules and/or units of competency are allocated TAFE IDs by the relevant TAFE authority. Schools Online offers you two ways of entering that identifying code for your students. You can enter them individually on the Maintain Student screen, or you can enter them for a group.
Searching for the TAFE ID Entry group
Menu: Home > Students > Group TAFE ID Entry > Group TAFE ID Entry Search

Students 52 Group TAFE ID Entry Search
To enter TAFE IDs for a group of students:
1. If you want to include the students who already have a TAFE ID, set the Include TAFE ID already allocated option.
2. Unless you want to view all students, enter the Year Level you want to view.
3. Click on the View button to display the Group TAFE ID Entry screen.
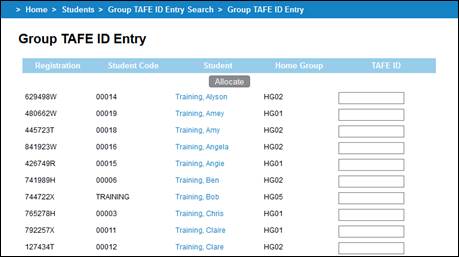
Students 53 Group TAFE ID Entry screen
Techniques for entering TAFE IDs
1. In the Group TAFE ID Entry screen, enter the TAFE IDs efficiently by:
· using the mouse to click in a TAFE ID field to enter a TAFE ID in it, or
· after entering the first TAFE ID, press the tab key twice (putting the cursor in to the next TAFE ID field) and enter the next TAFE ID.
2. Continue down the list in the same manner.
3. Click on the Allocate button.
Group Declarations Entry (NT Schools Only)
Map ID = 153
Student Declarations can only be changed via Schools Online for Northern Territory schools only. Schools Online offers you two ways of managing that identifying code for your students. You can enter them individually on the Maintain Student screen, or you can enter them for a group.
Menu: Home > Students > Group Declarations Entry > Group Declaration Search

Students 54 Group Declaration Search screen
1. Decide which group of students to process:
· Select a Home Group from the list to process students for a current home group.
· Enter the Year Level in the Year Level field to process students in a particular year level.
· Select the All Students option to process all students.
2. Click on the View button. The Group Declarations Entry screen is displayed.
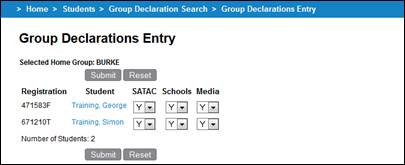
Students 55 Group Declarations Entry screen
3. Set the appropriate declarations and then click on the Submit button.
Add Self Directed Learning
Map ID = 187
The SACE Board of South Australia assessors and/or the SACE Board of South Australia-trained school-based assessors will evaluate the community learning on the evidence presented by the student. The assessors will make their decisions about the value of the learning that has taken place in terms of the:
· number of SACE credits that will be awarded;
· SACE level (Stage 1 or Stage 2) that was achieved;
· SACE standard achieved;
Once approved and assessed then stage 1 Self Directed Learning can be added in Schools Online.
Stage 2 Self Directed Learning must be submitted on paper to be added to Schools Online by the SACE Board of South Australia.
Adding Self Directed Learning
Once Self Directed Learning has been added to Schools it cannot be removed via Schools Online.
Menu: Home > Students > Add Self Directed Learning > Add Students to Self Directed Learning Search
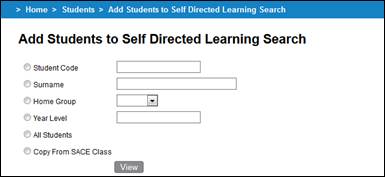
Students 56 Add Students to Self Directed Learning Search screen
To add students to Self Directed Learning:
1. Select an option to view:
· an individual student by entering a Student Code or Surname;
· a group of students by selecting a Home Group, Year Level or All Students; or
· the members of a current SACE class.
2. Click on the View button. The Add Students to Self Directed Learning screen is displayed.
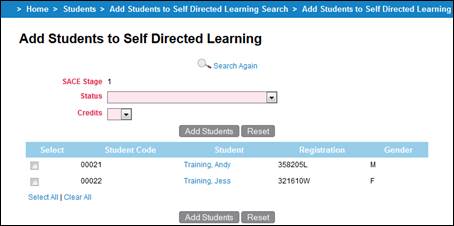
Students 57 Add Students to Self Directed Learning screen
3. Select the Status and Credits based on the SACE Board of South Australia assessor results from the student’s interview and evidence.
4. Select the students you want to add to Self Directed Learning from this list, and click Add Students. The Self Directed Learning Confirmation screen is displayed.
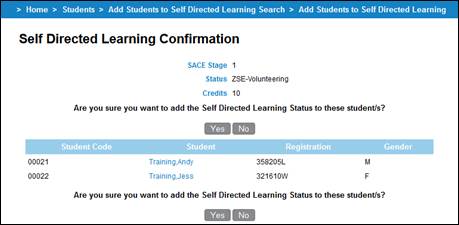
Students 58 Self Directed Learning Confirmation screen
5. Click on the Yes button.
Self Directed Learning has been added
Once the Self Directed Learning has been confirmed depending on the number of students added Schools Online will display a different screen.
· The View Enrolments screen is displayed for a student if you have added Self Directed Learning for one student.
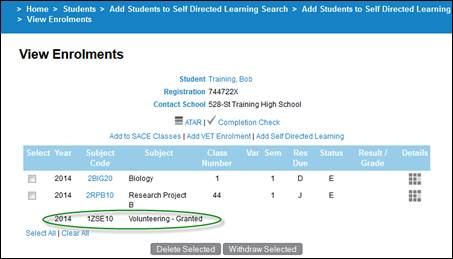
Students 59 View Enrolments screen with Self Directed Learning
· If you have added Self Directed Learning for multiple students Schools Online will display the Self Directed Learning Success screen.
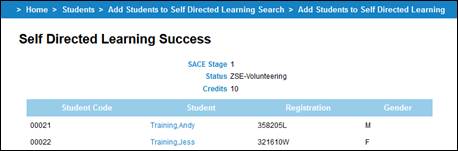
Students 60 Self Directed Learning Success screen
Student reports
Map ID = 154
The student reports available in Schools Online include:
· Certificate Print Name (SAM Colleges only)
· Declarations Checklist
· Potential Completion Details
· Student Details
· Student Summary
· Student Tracking Summary
· Students without a CEA record (SA Schools only)
· VET Unit Of Competency By Student
All reports will be displayed on the screen in pdf format. If you wish you can print the reports to a local printer.
Selecting a report
Menu: Home > Students > Student Reports > Student Reports Selection
· Select Student Reports from the Students menu or the Reports menu to display the Student Reports Selection screen.
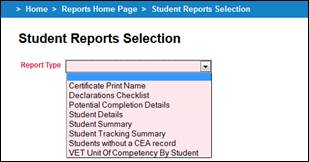
Students 61 Student Reports Selection screen
Certificate Print Name (SAM Colleges only)
The Certificate Print Name report lists those students who will receive a Record of Achievement (ROA) at the end of the year essentially students with at least one stage 2 enrolment.
It will list their full name as it would appear on the end of year SACE printed documentation it allow the SAM Colleges to ensure names are spelt correctly and placed in the order as the student wants the name to appear.
Menu: Home > Students > Student Reports > Student Reports Selection
1. From the Student Reports Selection screen, select Certificate Print Name as the Report Type.
2. Click on the OK button to display the Certificate Print Name screen.
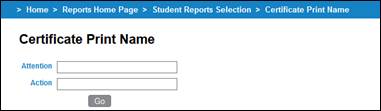
Students 62 Certificate Print Name
3. Enter details in the Attention and Action fields (optional).
4. Click on the Go button to view the report on screen. If you wish, you can save or print the report.
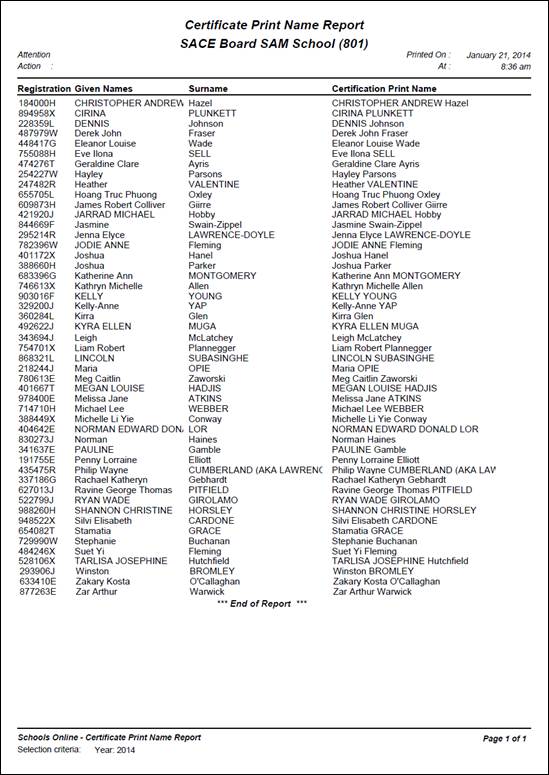
Students 63 Example of the Certificate Print Name report
Declarations Checklist
The Declarations Checklist report lists those students who have entered N (No) to one or more of the items in the declarations list.
When students register for the SACE they make declarations on their registration. For NTCET students the declarations can be changed by their contact school using Schools Online.
The declarations are:
· Institutions ... Whether or not the student agrees to results being circulated to schools and tertiary institutions
· Media ... Whether or not the student agrees to results being published in the media
· HEES ... Whether or not the student agrees to results being forwarded to SATAC.
Menu: Home > Students > Student Reports > Student Reports Selection
1. From the Student Reports Selection screen, select Declarations Checklist as the Report Type.
2. Click on the OK button to display the Declarations Checklist screen.
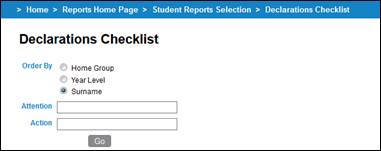
Students 64 Declarations Checklist
3. Select Home Group, Year Level or Surname as the report order.
4. Enter details in the Attention and Action fields (optional).
5. Click on the Go button to view the report on screen. If you wish, you can save or print the report.
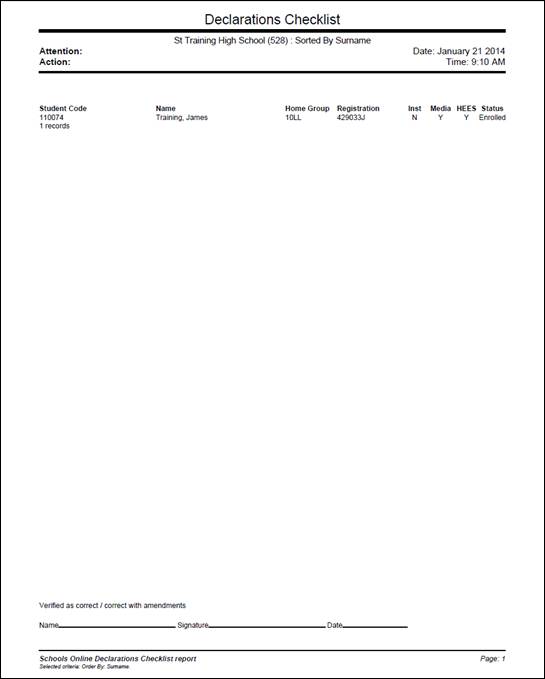
Students 65 Example of the Declarations Checklist report
Potential Completion Details
The Potential Completion Details report displays the potential completion details for all students in the chosen group.
Menu: Home > Students > Student Reports > Student Reports Selection
1. From the Student Reports Selection screen, select Potential Completion as the Report Type.
2. Click on the OK button to display the Potential Completion screen.
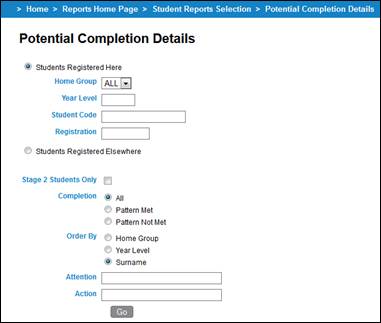
Students 66 Potential Completion Details
3. Select the group the report is to cover:
· To view the report for all students, leave Home Group selection as ALL.
· To view the report for the members of a home group, choose a Home Group from the list.
· To view the report for the members of one or more year levels, enter them in the Year Level field. Multiple year levels can be entered by separating them with a comma (e.g. 11, 12).
· Select the Students Registered Here or Students Registered Elsewhere option.
4. To exclude Stage 1 students from the report, select Stage 2 Students only.
5. Select a Completion option:
· All
· Pattern Met
· Pattern Not Met.
To identify students with potential completion problems select the ‘Pattern Not Met’ option.
6. Select Home Group, Year Level or Surname to order the report.
7. Enter details in the Attention and Action fields (optional).
8. Click on the Go button to view the report on screen. If you wish, you can save or print the report.
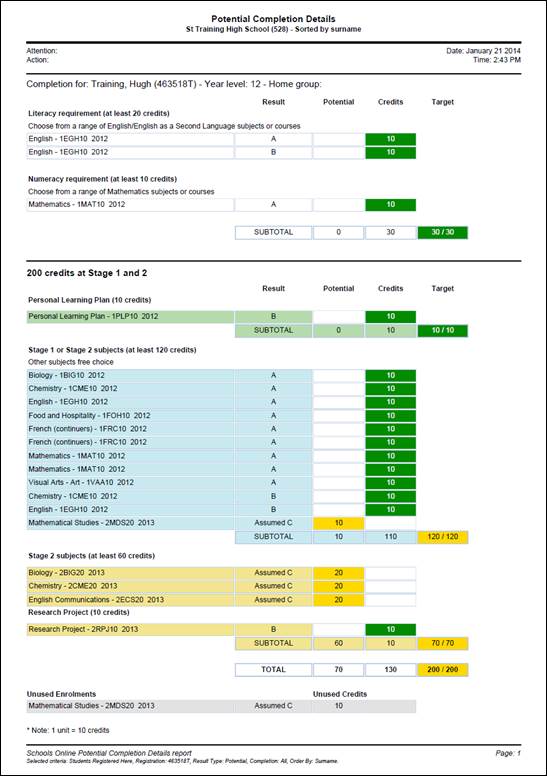
Students 67 Example of the Potential Completion Details report (SA)
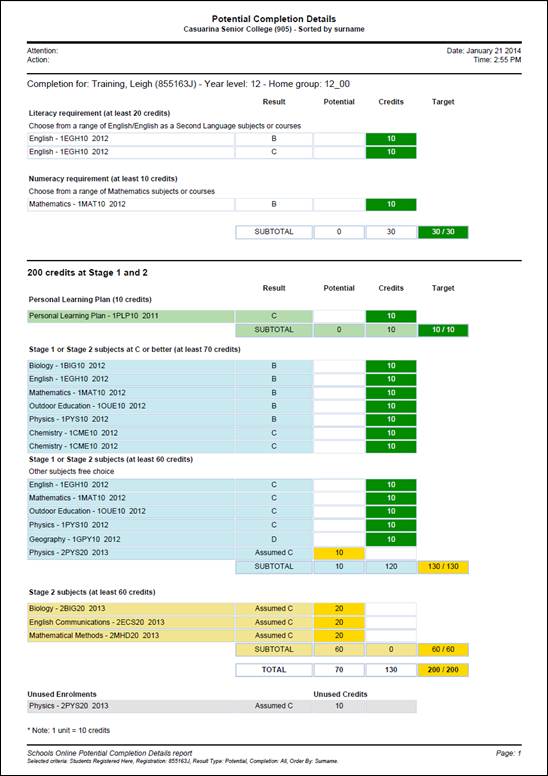
Students 68 Example of the Potential Completion Details report (NT)
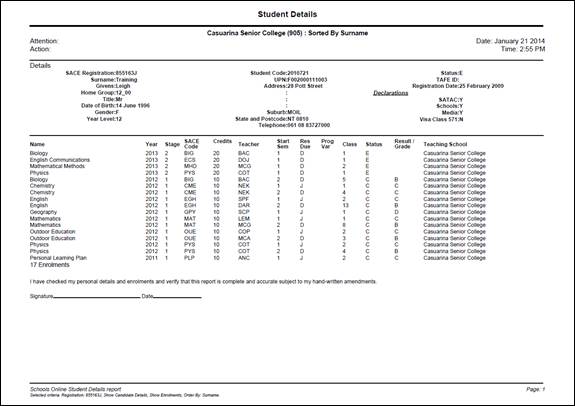
Student Details
The Student Details report lists each student's personal details and enrolment history. You can choose to print the report for each student in a home group or year level, or for an individual student.
Menu: Home > Students > Student Reports > Student Reports Selection
1. From the Student Reports Selection screen, select Student Details as the Report Type.
2. Click on the OK button to display the Student Details screen.
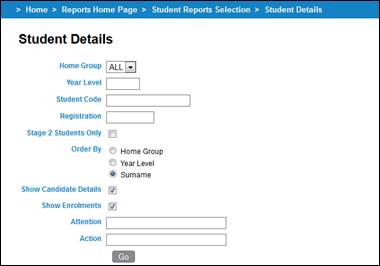
Students 69 Student Details
3. Select the group the report is to cover:
· To view the report for all students, leave Home Group selection as ALL.
· To view the report for the members of a home group, choose a Home Group from the list.
· To view the report for the members of one or more year levels, enter them in the Year Level field. Multiple year levels can be entered by separating them with a comma (e.g. 11, 12).
· To view the report for the one particular student, enter the Student Code or Registration.
4. To order the report, select Home Group, Year Level or Surname.
5. Enter details in the Attention and Action fields (optional).
6. Click on the Go button to view the report on screen. If you wish, you can save or print the report.
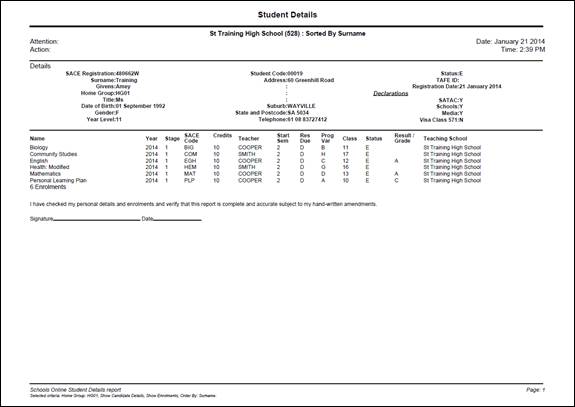
Students 70 Example of the Student Details report (SA)
Students 71 Example of the Student Details report (NT)
Student Summary
The Student Summary report lists a summary of personal details for each student in the chosen group.
Menu: Home > Students > Student Reports > Student Reports Selection
1. From the Student Reports Selection screen, select Student Summary as the Report Type.
2. Click on the OK button to display the Student Summary screen.

Students 72 Student Summary
3. Select the group the report is to cover:
· To view the report for all students, leave Home Group on ALL.
· To view the report for the members of a home group, choose a Home Group from the list.
· To view the report for the members of one or more year levels, enter them in the Year Level field. Multiple year levels can be entered by separating them with a comma (e.g. 11, 12).
4. Select Home Group, Year Level or Surname to order the report.
5. Enter details in the Attention and Action fields (optional).
6. Click on the Go button to view the report on screen. If you wish, you can save or print the report.
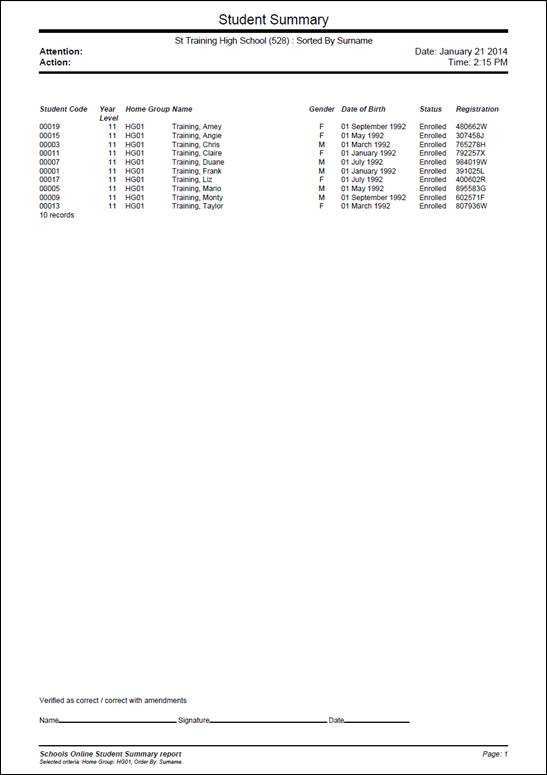
Students 73 Example of the Student Summary report
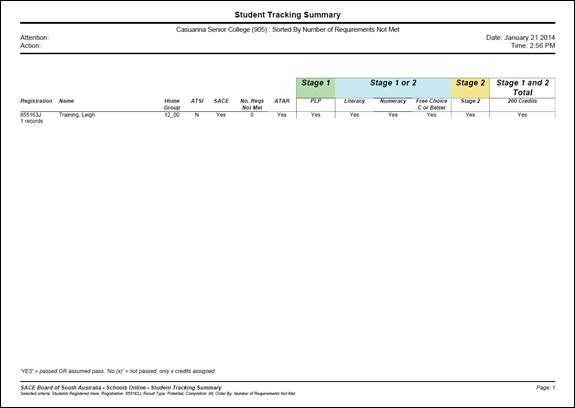
Student Tracking Summary
The Student Tracking Summary report lists each student's progress towards the SACE or NTCET. Whether or not each student has satisfied the requirements for each category is listed so that school staff can see at a glance what areas have still to be addressed to complete the SACE/NTCET. You can choose to print the report for each student in a home group or year level, or for an individual student.
Menu: Home > Students > Student Reports > Student Reports Selection
1. From the Student Reports Selection screen, select Student Tracking Summary as the Report Type.
2. Click on the OK button to display the Student Tracking Summary screen.
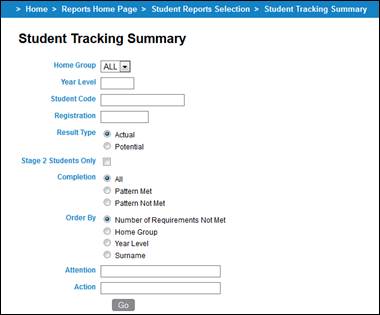
Students 74 Student Tracking Summary
3. Select the group the report is to cover:
· To view the report for all students, leave Home Group selection as ALL.
· To view the report for the members of a home group, choose a Home Group from the list.
· To view the report for the members of one or more year levels, enter them in the Year Level field. Multiple year levels can be entered by separating them with a comma (e.g. 11, 12).
· To view the report for the one particular student, enter the Student Code or Registration.
4. To exclude Stage 1 students from the report, select Stage 2 Students only.
5. Select Actual or Potential as the Result Type.
6. Select a Completion option:
· All
· Pattern Met
· Pattern Not Met.
To identify students with potential completion problems select the ‘Pattern Not Met’ option.
7. Select Number of Requirements Not Met, Home Group, Year Level or Surname to order the report.
8. Enter details in the Attention and Action fields (optional).
9. Click on the Go button to view the report on screen. If you wish, you can save or print the report.
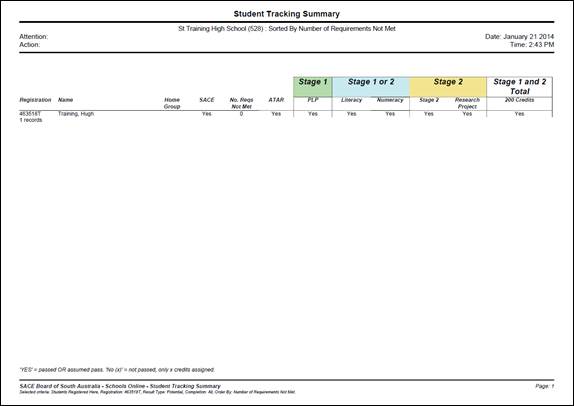
Students 75 Example of the Student Tracking Summary report (SA)
Students 76 Example of the Student Tracking Summary report (NT)
Students without a CEA record report (SA Schools only)
The Students without a CEA record report lists students aged 16 - 17 without a CEA record.
Menu: Home > Students > Student Reports > Student Reports Selection
1. From the Student Reports Selection screen, select Students without a CEA record as the Report Type.
2. Click on the OK button to display the Students without a CEA record screen.
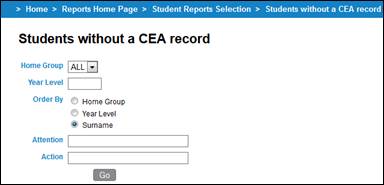
Students 77 Students without a CEA record
3. Select the group the report is to cover:
· To view the report for all students, leave Home Group selection as ALL.
· To view the report for the members of a home group, choose a Home Group from the list.
· To view the report for the members of one or more year levels, enter them in the Year Level field. Multiple year levels can be entered by separating them with a comma (e.g. 11, 12).
4. Select Home Group, Year Level or Surname to order the report.
5. Enter details in the Attention and Action fields (optional).
6. Click on the Go button to view the report on screen. If you wish, you can save or print the report.
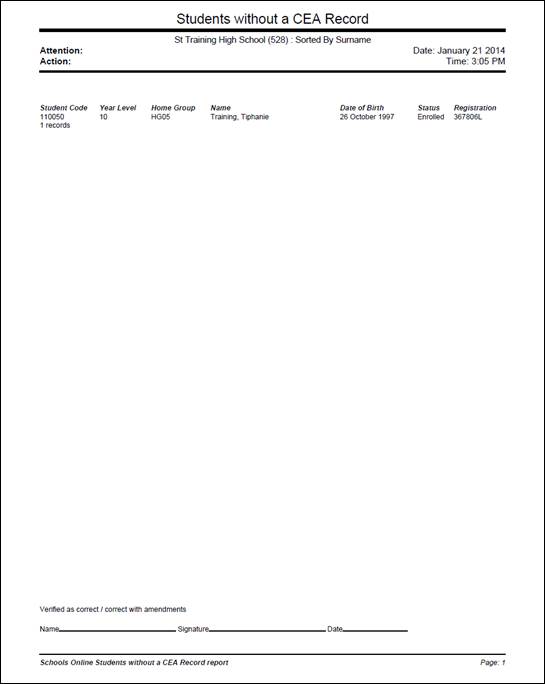
Students 78 Example of the Students without a CEA record report
VET Unit of Competency by Student
The VET Unit of Competency by student report lists each student in the selected group together with the VET Unit of Competency each student has enrolled in. A result is displayed for each enrolment.
Menu: Home > Students > Student Reports > Student Reports Selection
1. From the Student Reports Selection screen, select VET Unit of Competency By Student as the Report Type.
2. Click on the OK button to display the VET Unit of Competency By Student screen.
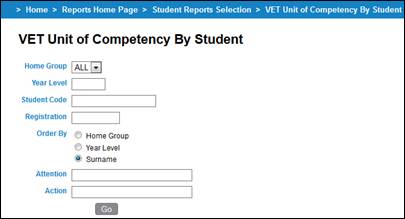
Students 79 VET Unit of Competency By Student
3. Select the group the report is to cover:
· To view the report for all students, leave Home Group selection as ALL.
· To view the report for the members of a home group, choose a Home Group from the list.
· To view the report for the members of one or more year levels, enter them in the Year Level field. Multiple year levels can be entered by separating them with a comma (e.g. 11, 12).
· To view the report for the one particular student, enter the Student Code or Registration.
4. To set the report order, select Home Group, Year Level or Surname.
5. Enter details in the Attention and Action fields (optional).
6. Click on the Go button to view the report on screen. If you wish, you can save or print the report.
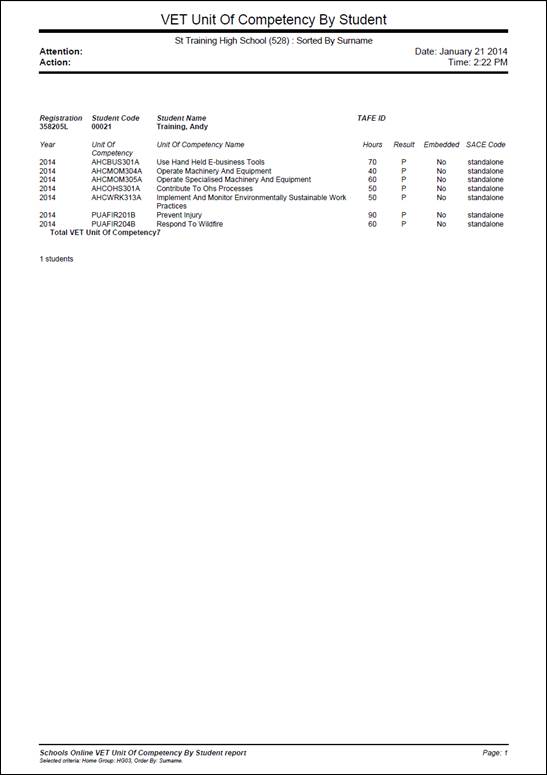
Students 80 Example of the VET Unit of Competency by Student report